Error mode

On occasion, SYNCrew will put a user into “error mode.” This happens for a variety of reasons and does NOT mean the employee did anything wrong!

Error mode happens anytime the system receives information that does not make sense. For example, if a Worker is clocked out and another clock out comes through, the system does not know what to do – how can you clock out if you are already clocked out?

The red box will appear on Worker Profile pages when that user is in error more

When error mode is triggered, SYNCrew administrators are alerted and will resolve the issue within an hour during standard business hours and within approximately 8 hours during non-business hours. NO DATA IS LOST WHILE IN ERROR MODE. The system saves everything that comes in and it is added as the SYNCrew administrator clears the error.

Often times, error mode is caused by issues outside of anybody’s control. A common issue is when a Worker has a bad connection to the Internet. The phone will send the photo but get disconnected before receving confirmation from the server. If this happens, the phone will send again (as it should) but the server will get confused by it and put the user into error mode.

Error mode can also be triggered by actions taken by company administrators. Here are a few common examples:

  1. Editing the project or skill of a work block before the worker changes task or clocks out. Waiting until after the Worker clocks out or changing task to make your edit will avoid.
  2. Adding hours from the admin portal while the employee has unsent activity on their phone. In this case, the time entered by the administrator will over-ride the hours entered by the Worker on the app.
  3. Locking the time period before all hours have come in from user’s phones. If a Worker has unsent activity on their phone and the period is locked, the time entered by the administrator will over-ride the hours entered by the Worker on the app. Activity that comes in for an already locked period will be discarded.

Reports: Drive Time Reports

Drive time report is a way to quickly see what portion of the time your employees are engaged on a job during their clocked in hours.
We have had clients use this report to increase productivity greatly (over 10%).

If all employees are lower then you expect, it can be a sign that things could be more efficient across the board. Likewise, it may show a specific employee or group of employees being lower than expected. In all cases, we recommend emailing support@syncrew.com if you see something you do not expect because this report is sensitive to using the app exactly as designed. Some companies use the app differently, which is completely fine of course, but it can cause this report to be inacurate.

To run a Drive Time Report, do the following:

  1. Go to Reports in the left navigation and click Drive time reports. You will see the screen below where you enter the parameters to report on.
  2. Select time: Select the time period you want – please note that you can choose a week or a month and just click the drop down under your choice to pick the specific period you want.
  3. Select Team(s): Select the team(s) you wish to review.
  4. Non-productive projects: Optionally, you may add projects that are non-productive. Examples might be the office, supply house, or anywhere else the employees spend time but is not revenue generating. The report will show what percent of time is spent at these separately so owners and managers may gauge if there is an issue with too much time spent at these places.
  5. Click “Run”

Below is an example of what you will see when the results come back. In this case, we asked for November data for the San Francisco Team and noted that “800 Douglass, rwc” was a non-productive location.

As always, please contact us at support@syncrew.com if you have any questions.

Quickbooks Online Integration

SYNCrew can export data to Quickbooks Online! This flexible integration will let you get hours your team enters in SYNCrew directly into Quickbooks.

Initial Setup: The initial setup is a bit complicated due to the flexibility SYNCrew has built to make sure the hours get in how you need them. Unfortunately, due to the complex nature of the interactions between QBO and SYNCrew., we cannot help troubleshoot issues on the QBO side.

How to pull data: When you want to pull data from SYNCrew to Quickbooks, just follow these steps. Note that most people run these at the end of each pay period but you can run at other times or use the custom dates. Regardless, we recommend not running while workers are still clocked in for that period.

START IN SYNCREW: Open SYNCrew and do the following:

  1. Open SYNCrew and click on Settings in the navigation section at the left (circled in yellow below)
  2. Select QuickBooks underneath Settings (circled in green)
  3. Select the pay period you want (circled in purple)
  4. Click Save (circled in red)

5. Once the page reloads, pick “QBO” from the options under Quickbooks
6. Click “authorize quick books” to log into your QBO account

Now we need to set up the categories. Again, under settings, but this time click on “Configuration” and scroll down the page to find the “Employee Options” section.

You need to create at least one Category. If you create only one, it should be a simpler setup. Type a category name (Can be whatever you want) and click “Add”.

Then go back to the Quickbook settings, and into the “Time Sync Settings” and select the category.

If you added only one category, all the employees will be added to that category. Any employee of the selected category will have the hours imported into QB.

Finally, you have to make sure ALL EMPLOYEE AND PROJECT NAMES ARE THE SAME ACROSS SYNCREW AND QBO.

When you are ready to sync the hours, click on Update Quickbooks.

After you complete the steps above, check your email for a status update. If there were any issues with matching projects or workers to your data in Quickbooks, it will noted. Once you fix those issues, click “update quickbooks” again to send those hours over.

Teams

“Teams” are a way to group Workers together in SYNCrew and are viewed on the “teams” tab and are also filters that can be used in reports, worker time review and timesheets. Each worker MUST be on a team and all companies have a “default” team created when their SYNCrew account is created.

Different companies use teams for different reasons but here are some common reasons:

  • Manager name: Group workers by manager, where the managers name is the team name
  • Work location: For companies with different branch locations or large customer sites, the name of the brach or customer site can be set as the name
  • Work type: Some companies have different groups and they name the teams for the work type.

How to create and edit team

Creating a team is simple. Go to Settings –> Manage Teams. The following screenshot shows how to add a new team and how to edit the name of an existing team

Assigning workers to teams

Workers can be assigned to teams in two main ways:

  1. When editing a workers settings or creating a new worker, there is a place to select the team and it will update when the settings are saved.
  2. When you create or edit a team’s name as described above, you can check the box next to a name to put that person on the team. When you click “save,” all users who have a check box will be added to that team.

Assigning a manager to a team

Each team can have a manager assigned. The Manager is used to route certain alerts like time change request and in-app help request. A manager must have an admin account (limited or full admin) and then you can select them in the green box below when creating or editing the team.

Select team manager

Scheduling in the app

This article explains how your employees see schedules in the Android and iPhone app.

Alert for newly scheduled event: When you create an event in the admin portal, the employee(s) who had the new event scheduled will get a simple alert like the one shown below. This alert shows on the phone regardless of whether the app is open or closed (but the user does need to have alerts enabled for the SYNCrew app):

Home Screen if events are scheduled for current day: If the employee has an event scheduled for that day, their home screen (what they see when they open the app) will show the next scheduled event as you see below on the left. They can see their full schedule for the day by clicking “jobs today” as shown at the right:

To see future days: The user can select “My Time” from the menu and then click the “scheduled” button (circled in red below). That will show today by default but the user can click the arrows (circled in green) to see different days.

If you do not use scheduling for a given user, or they just don’t have any events scheduled in the near future, they just see the project selection screen shown here:

Worker Time Review

Worker Time review is the fastest way to check hours for your pay period. We recommend using Worker Time Review to quickly check how many hours your employees had each day, including overtime. Required edits can be made here, meal breaks added, missing days of job locations added and most other common changes as well.

This video is the easiest way to see how worker time review works:

Video is the easiest way to see how Worker Time Review works

How to run the Worker Time Review

  1. Select Worker Time Review from under the Manage in the left navigation panel
  2. On the page that loads, select your options:
    1. Team: select the teams you want [red underline below]. You can pick one team, a few teams, or all teams. The system will remember the teams you selected last time.
    2. Period ending: This is end date of the the pay period you want to review [green underline below]. Once you select the date, you may see a box pop up to indicate that the period is locked (more info on period lock). If you don’t see the right pay periods for your company, please email support@syncrew.com with details on your pay period cycle.
  3. Click “Run”

After you click Run, the hours will load you can easily see each worker’s activity. There are two views and the system will remember which you used last. Neither option is better and both show mostly the same information, so have a look at both and use the one you prefer.

Hours and Break Summary View

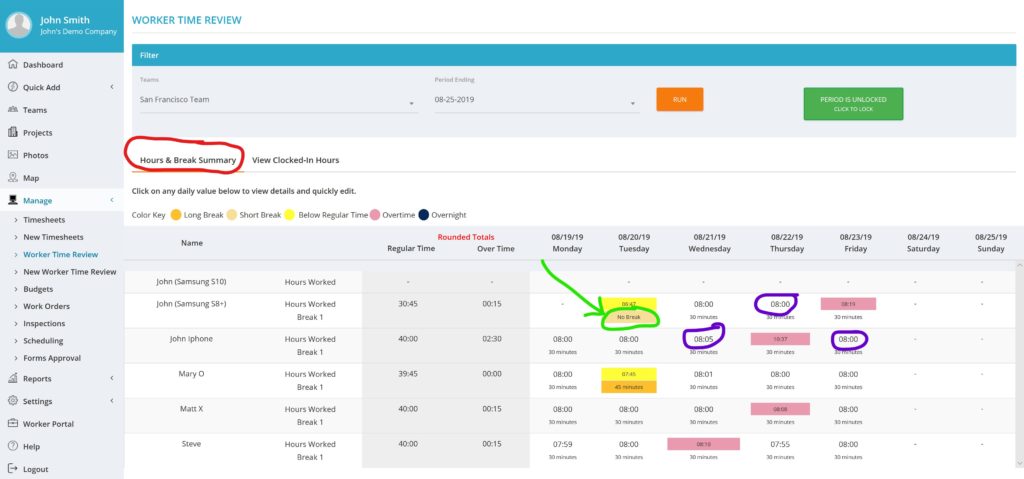
This is the more common view since it does the math of calculating hours for you! To enter this view, make sure you click on “hours and break summary” [circled in red below].

You can see each worker’s name, total hours for the pay period and then a break down of hours on each day, with breaks taken below. There are a few tricks as well:

View Photo and edit time: By clicking on the hours worked on a given day [examples are circled in purple above], you will see all the events in that day, as shown below.

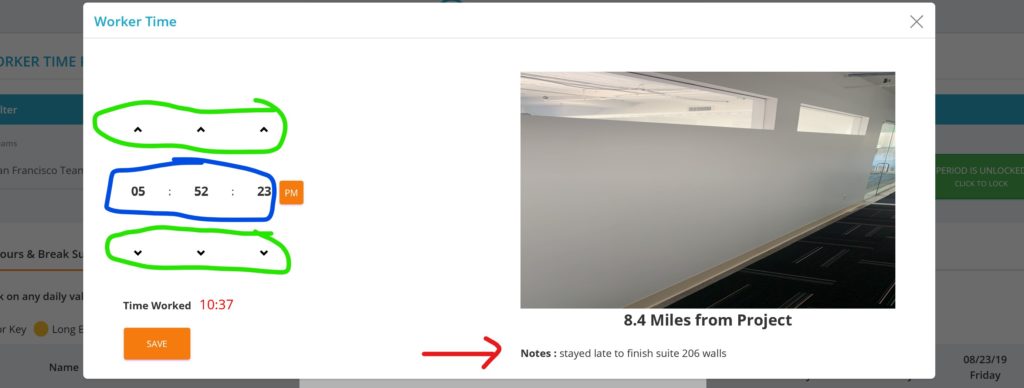
If you click on an event, you can see the photo. For example, if we click on the 5:52pm clock out above, we will see the box below. In the box below, you can see any notes the employee may have left and also make any needed edits by clicking on the arrows [circled in green below]. You can also click on the numbers [circled in blue below] to open a number pick box and prevent clicking 30 times to edit 30 minutes!

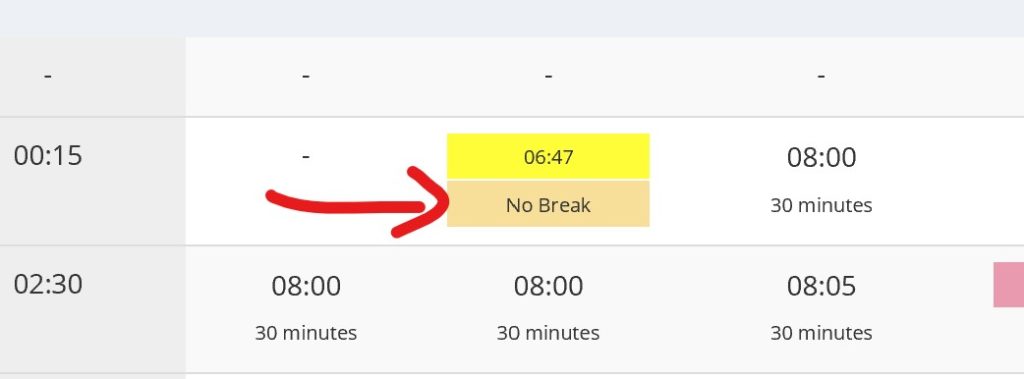
Add a break: From the hours and breaks summary view, you can also add a break on days where there is no break. To do this, click the box that says “no break” and follow the onscreen instructions.

Note that if there is already a break, but it’s not the correct duration, you can edit the start or end time of the existing break as shown above to correct the time.

View Clocked In Hours View

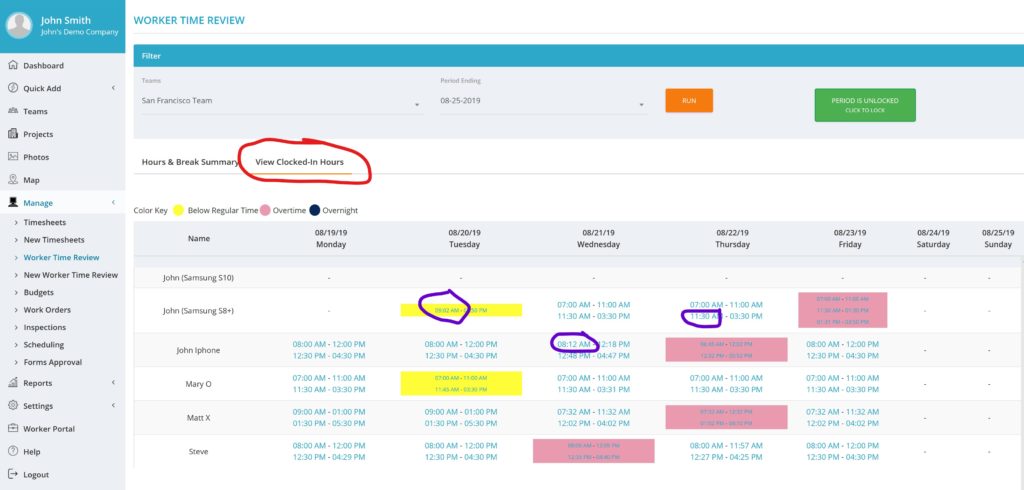
This view is used by people who want to see the time of the clock ins and outs. To enter this view, click on “View clocked in hours” [circled in red below].

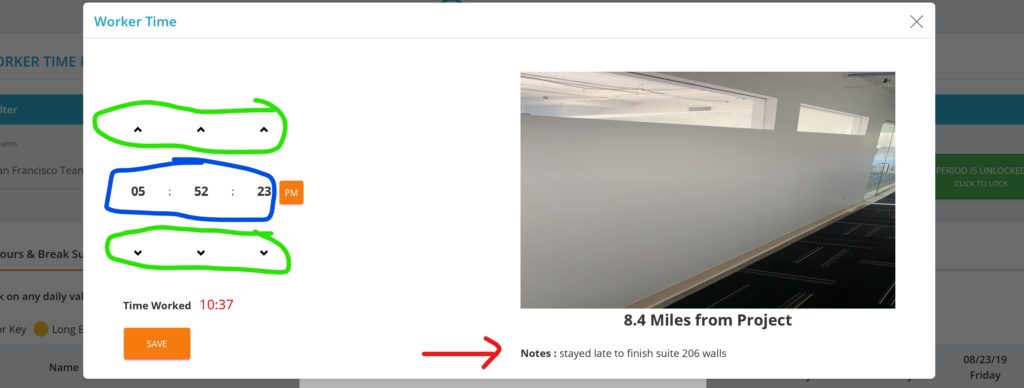
View Photo and edit time: By clicking on any of times shown [examples are circled in purple above], it will open a box to show any notes the employee may have left and also make any needed edits by clicking on the arrows [circled in green below]. You can also click on the numbers [circled in blue below] to open a number pick box and prevent clicking 30 times to edit 30 minutes!

Meal breaks cannot be added from this view.

Time Period Lock

Time Period Lock is a feature that allows you to prevent Limited Admin users from editing of hours after the payroll has been run. This article explains how to enable and use this feature.

Feature Description:

Time Period Lock allows FULL or PARENT ADMIN to “lock” a time period so that LIMITED ADMIN cannot make edits to that period while it is locked. Parent and Full admin are able to make edits to locked periods but will get a reminder that the period is locked before any edits are saved.

Full or Parent admin can lock and unlock any time period at any time. The time periods are based on the payroll schedule configured in SYNCrew. If you have quesitons about that, please contact us at support@syncrew.com and we can help set that up properly.

Limited admin will be able to see that a period is locked in Worker Time Review and Timesheets but will not be able to change the locked status. Additionally, in places where edits can be made (work block reports, activity reports, worker profile pages, etc), the buttons to edit and/or save edits are simply removed so that they cannot be edited. An example of this in a Work Block report is shown below.

The period that contain the bottom 3 rows has been locked so Limited Admin cannot make edits. The top rows are not locked so the edit buttons remain.

Note that when using the Time Period Lock, it is very important that only payroll administrators and people who understand the implications of editing time after payroll are set up as Full or Parent Admin. Everybody else needs to be a Limited Admin.

How to enable Time Period Lock

Time Period Lock is a company-wide setting (so it cannot be enabled for a single user or team) and is disabled by default. To turn it on

  1. Go to “Settings” in the left-navigation panel and select “Configuration”
  2. Scroll down to the “Timesheets” section of the configuration page
  3. Check the box next to “enable time period lock” (shown below)
  4. Scroll all the way down to the bottom and click “save”

How to lock or unlock a period:

Once you have enabled Time Period Lock as described above, locking or unlocking a time period is done by doing the following:

  1. Go to the Manage Menu in the left-navigation and select either Worker Time Review or Timesheets
  2. Select the time period you wish to lock or unlock
  3. If you are a Full or Parent admin, you will see either a green or red button appear at the right side of the screen. A green button indicates the period is unlocked and a red button indicates that the period is locked
  4. Click the button to change the option from unlocked to locked, or locked to unlock
When time period is unlocked, the indicator is green. Click to lock the period.

When time period is locked, the indicator is red. Click to unlock the period.

A few details

As with all things, the devil is in the details so here are a few of those:

  1. If a period is locked and events come in from a users phone, they will be discarded. As a practical example, If a person clocked out on their phone on Friday while they were out of cell coverage, then the period was locked on Sunday night. When the worker arrives on Monday and the clock out sends, it will be discarded by the system and never be seen. SYNCrew admin will attempt to preserve Progress Photos since they are not part of the timekeeping system.
  2. Events cannot be moved into a period. If a worker was accidentally clocked in overnight and the starting day is in a locked period while the ending day is not, you will be able to edit the clock out so long as it stays outside the locked period. This will have the effect of changing the time shown in a locked period since SYNCrew puts all hours on the day of the clock in.

Skill management

Every event in SYNCrew has a “Skill” associated with it. The information below explains how to enable skills for your company first and then for each employee.

Company enabled skills

Each company must have at least one enabled and can have as many as they wish. To make skills available for your company, go to Settings in the left navigation panel and then select “update skills.” That will show you the list of all SYNCrew skills and you just need to click the box to the left of any skill you want and click “Update” to save.

SYNCrew has hundreds of skills available. You can view the list by going to “Settings” in the left navigation panel, then selecting “Update Skills.” If you need a skill that is not available in the list, please email support@syncrew.com to request a new skill and they can typically be added quickly.

Worker enabled Skills

Each worker has a list of skills and must have at least one skill enabled. To change the skills, edit the list in their employee profile settings by putting a check box next to the desired skills and then click save.

If the employee only has one skill, all their work will automatically get assigned to it. If more then one skill is set up for a given employee, they will be prompted to select the appropriate skill at each clock in.

Project-Specific Skills

The worker enabled skills above can be over-ridden by location-specific skills list. To enable that, go to the project edit screen and scroll down until you see a check box next to “use location skills list”. Check that box and you will see your company’s enabled skills appear below. Select the skills you want workers to be able to select from the list and save the project settings. Once you have a location-based skills list for a project, workers will see ONLY that list of skills when they clock in there, regardless of what their own list looks like.

Skill-based Account Name

You can make the accounting name change based on the selected skill for certain projects. This is described in the “accounting name” section of the Project Settings article you can find HERE.

How employees can use Work Orders on the app

When using Work Orders to instruct your field team on what to do, they can view and close them from the field. This article explains how Workers can do this.

Closing Work Orders from the Admin Portal

Before going into that, many clients simply close It is also possible to close the work Orders from the office by clicking on the work order you want to close to view and edit the details. At the top, select “completed” from the “status” field toward the top of the screen. Then scroll down and click save. The work order will now be closed.

Closing Work Orders from the Worker app

In order to close a work order, a worker my open the work order on their phone. When they arrive a project where they have a work order assigned to them (or where there are unassigned work orders), they will see the screen below.

Clicking “open” above will open the work orders page that will show their work orders at that location. they can also see unassigned work orders by clicking on that tab below. They will see the title and summary in the list and they can touch a row to open it.

They will then see all the details of the work order. Clicking “Work on this WO” will alert the system that they are going to accept that work order and start working.

As a confirmation, they will see the work order number they working on as circled below:

When they go to change task or clock out, the system will ask if they want to close the work order (click “yes”) or leave it open (click “no”)

Once they click “yes” to close, the work order will be closed in the system.

Error 1039 in Quickbooks Web Connector

This error comes up pretty often when a client first starts using the Quickbooks Desktop integration. It is caused when the Quickbooks company file is moved from the computer where it was created. This can happen if you created your company on a desktop machine and now use it on a server or if you simply bought a new computer.

The instructions below are on Intuit’s website and while we at SYNCrew have followed them with success, we do not guarantee this since it is based on another company’s product. We also strongly recommend backing up your company file before starting this.

https://quickbooks.intuit.com/learn-support/en-us/your-books-or-my-company/fix-error-qbwc1039/00/294400#