Worker Time Review

Worker Time review is the fastest way to check hours for your pay period. We recommend using Worker Time Review to quickly check how many hours your employees had each day, including overtime. Required edits can be made here, meal breaks added, missing days of job locations added and most other common changes as well.

This video is the easiest way to see how worker time review works:

Video is the easiest way to see how Worker Time Review works

How to run the Worker Time Review

  1. Select Worker Time Review from under the Manage in the left navigation panel
  2. On the page that loads, select your options:
    1. Team: select the teams you want [red underline below]. You can pick one team, a few teams, or all teams. The system will remember the teams you selected last time.
    2. Period ending: This is end date of the the pay period you want to review [green underline below]. Once you select the date, you may see a box pop up to indicate that the period is locked (more info on period lock). If you don’t see the right pay periods for your company, please email support@syncrew.com with details on your pay period cycle.
  3. Click “Run”

After you click Run, the hours will load you can easily see each worker’s activity. There are two views and the system will remember which you used last. Neither option is better and both show mostly the same information, so have a look at both and use the one you prefer.

Hours and Break Summary View

This is the more common view since it does the math of calculating hours for you! To enter this view, make sure you click on “hours and break summary” [circled in red below].

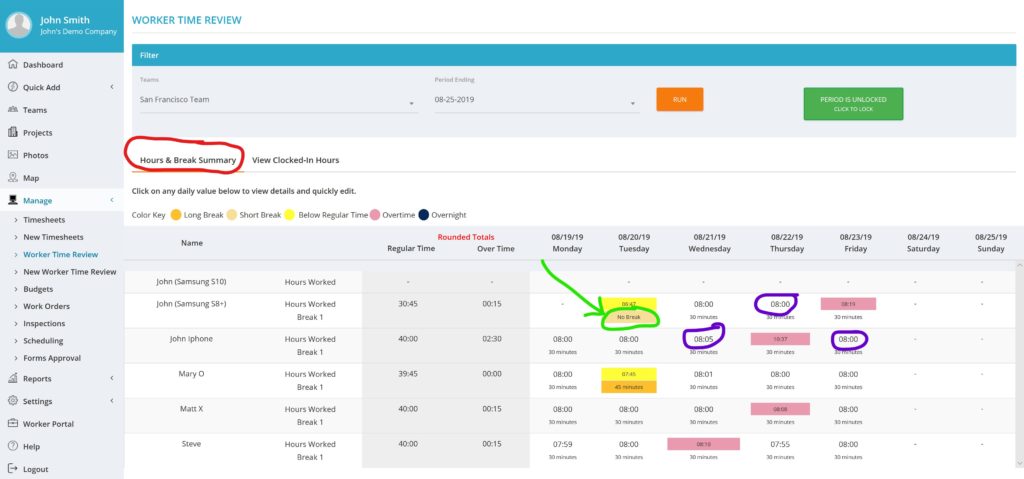
You can see each worker’s name, total hours for the pay period and then a break down of hours on each day, with breaks taken below. There are a few tricks as well:

View Photo and edit time: By clicking on the hours worked on a given day [examples are circled in purple above], you will see all the events in that day, as shown below.

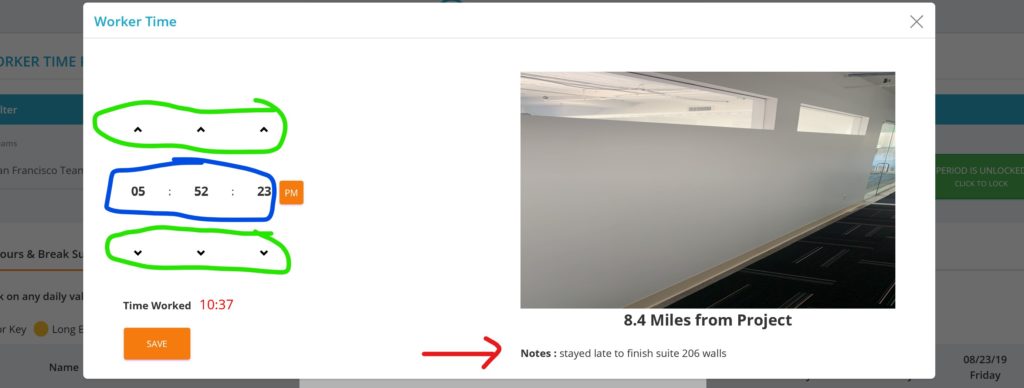
If you click on an event, you can see the photo. For example, if we click on the 5:52pm clock out above, we will see the box below. In the box below, you can see any notes the employee may have left and also make any needed edits by clicking on the arrows [circled in green below]. You can also click on the numbers [circled in blue below] to open a number pick box and prevent clicking 30 times to edit 30 minutes!

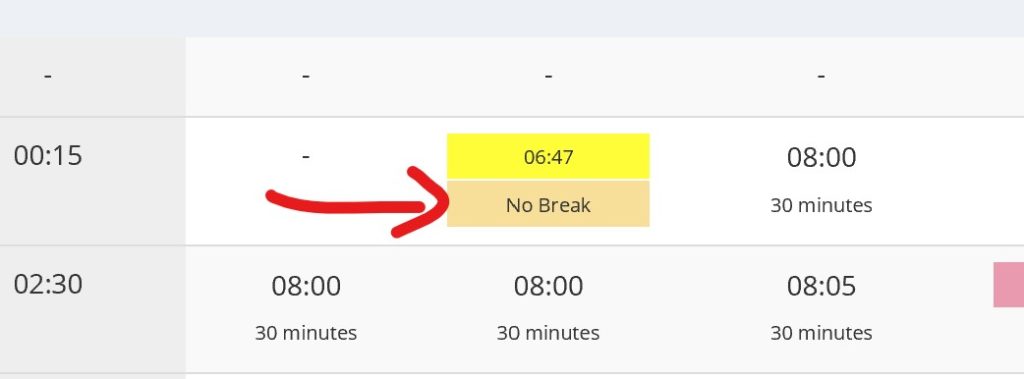
Add a break: From the hours and breaks summary view, you can also add a break on days where there is no break. To do this, click the box that says “no break” and follow the onscreen instructions.

Note that if there is already a break, but it’s not the correct duration, you can edit the start or end time of the existing break as shown above to correct the time.

View Clocked In Hours View

This view is used by people who want to see the time of the clock ins and outs. To enter this view, click on “View clocked in hours” [circled in red below].

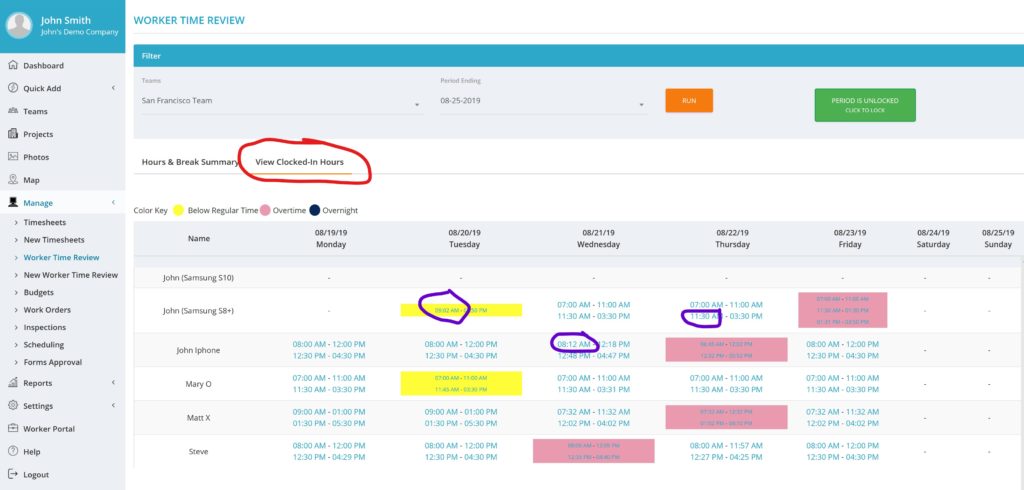
View Photo and edit time: By clicking on any of times shown [examples are circled in purple above], it will open a box to show any notes the employee may have left and also make any needed edits by clicking on the arrows [circled in green below]. You can also click on the numbers [circled in blue below] to open a number pick box and prevent clicking 30 times to edit 30 minutes!

Meal breaks cannot be added from this view.

Time Period Lock

Time Period Lock is a feature that allows you to prevent Limited Admin users from editing of hours after the payroll has been run. This article explains how to enable and use this feature.

Feature Description:

Time Period Lock allows FULL or PARENT ADMIN to “lock” a time period so that LIMITED ADMIN cannot make edits to that period while it is locked. Parent and Full admin are able to make edits to locked periods but will get a reminder that the period is locked before any edits are saved.

Full or Parent admin can lock and unlock any time period at any time. The time periods are based on the payroll schedule configured in SYNCrew. If you have quesitons about that, please contact us at support@syncrew.com and we can help set that up properly.

Limited admin will be able to see that a period is locked in Worker Time Review and Timesheets but will not be able to change the locked status. Additionally, in places where edits can be made (work block reports, activity reports, worker profile pages, etc), the buttons to edit and/or save edits are simply removed so that they cannot be edited. An example of this in a Work Block report is shown below.

The period that contain the bottom 3 rows has been locked so Limited Admin cannot make edits. The top rows are not locked so the edit buttons remain.

Note that when using the Time Period Lock, it is very important that only payroll administrators and people who understand the implications of editing time after payroll are set up as Full or Parent Admin. Everybody else needs to be a Limited Admin.

How to enable Time Period Lock

Time Period Lock is a company-wide setting (so it cannot be enabled for a single user or team) and is disabled by default. To turn it on

  1. Go to “Settings” in the left-navigation panel and select “Configuration”
  2. Scroll down to the “Timesheets” section of the configuration page
  3. Check the box next to “enable time period lock” (shown below)
  4. Scroll all the way down to the bottom and click “save”

How to lock or unlock a period:

Once you have enabled Time Period Lock as described above, locking or unlocking a time period is done by doing the following:

  1. Go to the Manage Menu in the left-navigation and select either Worker Time Review or Timesheets
  2. Select the time period you wish to lock or unlock
  3. If you are a Full or Parent admin, you will see either a green or red button appear at the right side of the screen. A green button indicates the period is unlocked and a red button indicates that the period is locked
  4. Click the button to change the option from unlocked to locked, or locked to unlock
When time period is unlocked, the indicator is green. Click to lock the period.

When time period is locked, the indicator is red. Click to unlock the period.

A few details

As with all things, the devil is in the details so here are a few of those:

  1. If a period is locked and events come in from a users phone, they will be discarded. As a practical example, If a person clocked out on their phone on Friday while they were out of cell coverage, then the period was locked on Sunday night. When the worker arrives on Monday and the clock out sends, it will be discarded by the system and never be seen. SYNCrew admin will attempt to preserve Progress Photos since they are not part of the timekeeping system.
  2. Events cannot be moved into a period. If a worker was accidentally clocked in overnight and the starting day is in a locked period while the ending day is not, you will be able to edit the clock out so long as it stays outside the locked period. This will have the effect of changing the time shown in a locked period since SYNCrew puts all hours on the day of the clock in.

Skill management

Every event in SYNCrew has a “Skill” associated with it. The information below explains how to enable skills for your company first and then for each employee.

Company enabled skills

Each company must have at least one enabled and can have as many as they wish. To make skills available for your company, go to Settings in the left navigation panel and then select “update skills.” That will show you the list of all SYNCrew skills and you just need to click the box to the left of any skill you want and click “Update” to save.

SYNCrew has hundreds of skills available. You can view the list by going to “Settings” in the left navigation panel, then selecting “Update Skills.” If you need a skill that is not available in the list, please email support@syncrew.com to request a new skill and they can typically be added quickly.

Worker enabled Skills

Each worker has a list of skills and must have at least one skill enabled. To change the skills, edit the list in their employee profile settings by putting a check box next to the desired skills and then click save.

If the employee only has one skill, all their work will automatically get assigned to it. If more then one skill is set up for a given employee, they will be prompted to select the appropriate skill at each clock in.

Project-Specific Skills

The worker enabled skills above can be over-ridden by location-specific skills list. To enable that, go to the project edit screen and scroll down until you see a check box next to “use location skills list”. Check that box and you will see your company’s enabled skills appear below. Select the skills you want workers to be able to select from the list and save the project settings. Once you have a location-based skills list for a project, workers will see ONLY that list of skills when they clock in there, regardless of what their own list looks like.

Skill-based Account Name

You can make the accounting name change based on the selected skill for certain projects. This is described in the “accounting name” section of the Project Settings article you can find HERE.