All your questions about the employee app are answered here. Please remember that our SYNCrew team is always happy to get involved to directly help your employees.
This article discusses what the app is and how workers use it. Read THIS ARTICLE OVER HERE about how to set it up.
What is the Kiosk app?
The Kiosk app allows multiple workers to log in using the same device. That is different from the traditional SYNCrew app that is designed to be used exclusively by a single worker. Often times, the device is a tablet but it also runs on phones. Both Android and iOS (ipads) are supported. The most common use cases for the kiosk app are:
On-site workers who do not move around like factory, warehouse, or office workers. In these cases, typically an iPad or Android tablet will be secured to a wall near the entrance.
Workers who don’t want to use their own phones and where the company does not want to use the manager/managed worker setup. In these cases, the kiosk app is loaded onto a managers phone and the workers ask to use it when they punch in or out.
How workers use the kiosk
Once the Kiosk is set up, a worker simply opens the app on the phone or tablet and clocks in or out in just a few seconds, like this:
CLOCK IN:
1) Enter phone number and note that language can be changed here as well in the upper-right
2) The worker fills in any info that is required (based on your app’s setup). The camera will automatically take a selfie when the worker clicks “clock in.”
3) The app will confirm the clock in was completed
4) The app automatically returns to the main ready screen for the next worker to use
CLOCK OUT:
1) Just as at the start, the worker enters their phone number and clicks “Go”
2) The worker fills in any information the app was set up to collect and takes a selfie photo when clicks either:
Clock out: to clock out for the day
Leave location: to leave this location, but keep their clock running
3) The app will confirm that the clock out was completed
4) The app automatically returns to the main ready screen for the next worker to use
Set up the Kiosk app
The Kiosk app is meant to be set up by an Admin. Your company can have different kinds of kiosks in different places and for different uses. Please read about setting up the kiosk app HERE.
As always, if you have any trouble or questions, please reach out to your account manager or support@syncrew.com and we’ll be happy to help you out!
This article discusses how to set up the kiosk app on a new device or at a new location. Read THIS ARTICLE OVER HERE to learn about what the app is and how workers use it.
Initial setup
1) Log in using an ADMIN user. The admin will set up the kiosk first, then workers can use it.
If you plan to have people in the field set these up and those people do not have admin accounts already, you can create a limited admin account for them so they can do this. LEARN ABOUT LIMITED ADMIN USERS
2) After you log in, you will be presented with this setup screen. The left side of the screen relates to setting up which project the kiosk is located at and the right side deals with how to manage your custom fields.
Project Selection:
Pre-pick project: Search for the project where the kiosk is located and click on it. Once you select it, you will see the name shown at the top of the screen (red box at right).
To clear the currently selected project, click “clear”.
Worker select project: You can leave the project blank so that the worker will need to select the project when they clock in. This is similar to not having the project locked above, except if it is blank, there will be no project pre-selected.
In most situations, you will want to “Lock” the project by clicking the box (orange arrow at right). If the project is “locked,” workers will not be able to clock into different projects from this Kiosk app. If you leave it unlocked, the selected project will show up and be pre-selected, but the workers can change it at clock in time.
If you are unsure about which of these options will be best for your situation, please reach out to us anytime at support@syncrew.com
Custom Fields:
What you see on the right side of the setup screen is based on your company’s settings. You can learn more about custom fields here.
When the screen loads, each row shows the name of the custom field. For each entry, you can:
Enter a default value. For example, if you enter “1234” in the work order number field, when a worker clocks out, this field will have “1234” in it automatically, but the worker can edit it.
Lock that value. Following the prior example, if you click “lock” next to the work order number field, when a worker goes to clock out, “1234” will be pre-filled and they will NOT be able to change it.
If you leave all this blank, the worker will just be required to enter all the information when they clock out.
Once all your settings are done, click “SAVE” and your kiosk app is ready to use. You should see the screen below that your workers will use to clock in. If you ever need to edit the settings, click the
As always, if you have any trouble or questions, please reach out to your account manager or support@syncrew.com and we’ll be happy to help you out!
The SYNCrew app allows workers to request help directly in the app. Since workers must already be logged in, the majority of requests that come from here are not actually technical support issues so they are first routed to the people who know the worker best – their manager or company administrator. The email you receive has the text the worker typed to describe their issue and also a link to open their profile page so you can quickly and easily get right the their page to see what is happening. If you receive a support request and you don’t know how to answer the question, you can forward the request to suppor@syncrew.com.
Once the worker clicks to submit their request for help, a simple email gets sent to either a single company email or the manager of the team that the worker is assigned to. Here are your two options for how to route that email.
Single Email: This option will send all change requests to a single email address. This is most often used for companies with a centralized IT function.
Send to Manager: This option will route the help request based on who is set as the manager of the team that the worker is assigned to. In the event that a team’s manager is disabled (because they left the company or have a new role), those help request will go to a backup email. To learn how to set up a manager for a team, click HERE.
Most of the time, workers will clock themselves out without issue. But on occasion, an admin may need to clock the worker out. The most common reasons are that the worker’s phone broke or they may no longer work for you.
If you find yourself clocking people out every day, we recommend that you talk to the employees and make sure they know how to ensure their app is syncing with the server as described here: Why events sometimes don’t sync
On to why you are here – how to clock somebody out! There are two ways to do this:
Worker Profile Page: Go to the Workers profile page (click their name on the dashboard or tames page). If they are currently clocked in, you will see a “clock out worker” button at the top-right of that page. Click that to clock out the worker.
Worker Time Review: In worker Time Review, you can click on the day that does not have a clock out and you’ll see a “clock out worker” button at the bottom of the activity. Click that to clock out the worker.
SYNCrew has four available fields that can be enabled that workers can user at change task or clock out. Each field can be set as optional (worker can use them, but are not required) or mandatory (worker cannot leave site or clock out until they are completed).
Once these are enabled, they will show up all through the system including:
Each photo
Work block report
Activity report
Timesheets
Most places where notes are shown
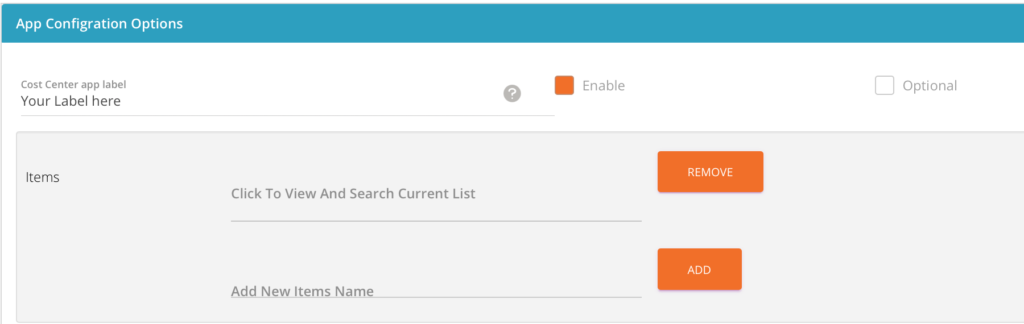
These fields are each a little different and are described below. To name and enable these, go to Settings –> Configuration and then scroll down to “App Configuration Options.”
Pick List:
The “Cost Center” is a PICK LIST field that workers will pick a value from a pre-set list when they change skill on a jobsite, change jobsites, or clock out. It can be optional or mandatory.
To enable this:
Type your label under “Cost center app label”
Click the box next to “enable”
If desired, click the box next to “optional” if DO NOT want to require workers to fill this out
Click into “add new item name” and type your first pick list value. Click “add” and then repeat until your whole list has been entered.
Scroll all the way down and click “save”
Your worker’s app will automatically update shortly after you click save.
Screenshot of where you configure the “Cost Center” field
Text Fields:
The “Job Identifier” and “Custom Text Field” fields are identical. Each one enables a TEXT field that workers fill out when they change skill on a jobsite, change jobsites, or clock out. It can be optional or mandatory.
To enable this:
Type your label under “Job Identifier app label” or “Custom Text Field app label”
Click the box next to “enable”
If desired, click the box next to “optional” if DO NOT want to require workers to fill this out
Scroll all the way down and click “save”
Your worker’s app will automatically update shortly after you click save.
Number-only Field:
The “Material Cost” field enables a NUMBER-ONLY field that workers fill out when they change skill on a jobsite, change jobsites, or clock out. It can be optional or mandatory.
To enable this:
Type your label under “Material Cost app label”
Click the box next to “enable”
If desired, click the box next to “optional” if DO NOT want to require workers to fill this out
Scroll all the way down and click “save”
Your worker’s app will automatically update shortly after you click save.
You can enable the following features by going to Settings –> Configure, and then scrolling down to “App configuration”. After changing settings, be sure to scroll all the way down and click “save”
Custom Data Fields to be filled in with the app during work: SYNCrew has some optional fields that you can enable to allow (or require) workers to fill in as they leave a project or change their skill. There are text, number and pick list fields available and they are commonly used for things like description of work, materials used, contract vs. Time and Material, but they are very flexible so let us know how you want to use them. These fields can be optional or required, in which case the worker cannot move on until they enter the required information. Click HERE to learn more.
Custom buttons on app home screen: When a worker is clocked in, the app has default buttons that say “take photo or video,” “Start meal break,” “go to next jobsite,” and “done for the day.” These may not be exactly right for your type of work and so you can change what these button show. To use custom text, click the check box marked by the red circle below and then edit the button names to what you want for English and Spanish. For workers whose phones are in other languages, it will show English. Remember to scroll down and click “save” when you are done.
Add Break Time Enable: Checking the box next to this option makes is so the app will allow workers to add their breaks at the end of the day. Specifically, in the event that a worker did not take a break during the day, when they clock out, the app will ask if they want to add a break for the day. If the workers says to add a break, it will be added in the middle of the last work block they worked.
Allow worker to end break after 30 minutes, regardless of when button is clicked: Checking the box next to this option will add a feature to help workers correct the somewhat common mistake of forgetting to clock back in after lunch. When this option is enabled, and the worker has been on lunch break for more than 30 minutes, a button will appear that says “end break after 30 minutes.” This way, if the worker remembers much later that they never ended their break, they can easily click to end it after 30 minutes instead of ending it then and asking an admin to correct the time.
Photo Flags: Photo flags are a way to categorize photos. When a worker takes a progress photo, they will have the option to add a flag from the list you enter here. These are used for many things but common examples are for receipts, pre-existing damage, serving notices, and things like that. Importantly, each SYNCrew client sets their own photo flags so they can be whatever YOU need! Read more about photo flags HERE.
SYNCrew’s form functionality can be used to create COVID-19 check-in forms to capture daily health data for your employees. Employees can access the COVID-19 screening form through the SYNCrew app and answer all the questions there. A completion email will be sent to an address of your choosing.
The instructions below walk you through creation of a form and setting it to be mandatory.
How to create a new form:
Click “New Custom Form” at the top of the page
On the pop up, enter the name of the form and, optionally, one email address (you can add more emails while editing the form later)
Click “Save”
Now follow the steps to edit forms below
Setting up the form
This refers to the options at the top of the forms setup page
Enable: This option just enables or disables the form. If there is a check box showing, the form is enabled.
Send to project email: When this option is selected, completed forms will be sent to the email(s) that are listed for the Project. You can see these emails by clicking “edit project” from the project profile page.
Email address for completed form: Whenever a form is completed, these emails will receive the form.
Name: This is the name that shows up on the form list in the app and admin portal
Project: This setting managed when the form can be seen by workers in the field. If you want the form to appear both clocked in and out, you just need to copy the form once completed and set the copy to have different project settings
Clocked in project: The form will show anytime a user is clocked into any project (as you are now)
Single project: The user will see the form when they are clocked into ONLY that selected project. They will also see that form if you select “allow user to see while clocked out” AND they search for that project.
Allow user to select: These forms will only be seen while the user is clocked out.
ALWAYS CLICK “UPDATE” AFTER EDITING THESE SETTINGS OR THEY WILL NOT BE SAVED
In this example, we have three questions we want to ask:
1. Within the last 10 days have you been diagnosed with COVID-19 or had a test confirming you have the virus?
2. Do you live in the same household with, or have you had close contact* in the past 14 days with someone who has been in isolation for COVID-19 or had a test confirming they have the virus? *“Close contact” is defined as living in the same house, being an intimate partner, being a caregiver, or being within 6 feet of an individual for longer than 10minutes who has COVID-19.
3. Have you had any one or more of these symptoms today or within the past 24 hours, which is new or not explained by a reason other than possibly having COVID-19?
Possible responses should be Yes/No for the first two questions and a list of symptoms on the third.
After we’ve setup the header info (section above), we can add the questions one by one.
To add a question, click where it says “Check Box” in the bottom of the form and select “List” as the type for the first question. As the possible answers are Yes/No, we select “List” and then add the Yes/ No responses.
Click on submit and you will get a pop-up. In this pop-up, type (or copy/paste) the first question where it says “label” . This will be what the employees will see as the question in the app.
Click Save, then click on “edit” to the right, to add the possible responses. The pop-up opens again, this time allowing you to add the responses. Type the first response in the field that says “Add” and then click on the Add button. Do the same for every possible response, in this case it’s only Yes and No.
Click Save, then move on to the next question. Again, click below where it says “Check box” and repeat the same process.
The third question is slightly different, as the employee could have one or more symptoms at once. Hence, we pick “Multiple Pick List”, allowing the employee to select more than one response.
The rest of the process is the same, except we will add more possible responses than just Yes or No. Another important difference is to select “Optional” on top, that way a response is not required when the employee has no symptoms. Otherwise, the form will force the user to choose at least one.
When you added all the responses, click save.
To finish, click “update” to finalize the form.
Set the Form as required
Once your form is created, go back to the main forms setup screen and select your COVID form in the dropdown labeled, “Required at start of day.” Then click save to the right.
Now your workers will be required to complete this form before starting work with any clock in that follows a clock out. If they change task throughout the day as they work, they will only complete this form once. If they clock out and then come back to work for whatever reason, they would complete the form again.
Your workers will need to be sure they have recently updated apps so if they are able to clock in without completing the form, that is most likely the issue. Have them update the app and then leave it open for a few minutes with good wifi or cell signal and it should update properly to require the form.
How to review forms
The admins can now access the form via the Reports -> Custom Form reports Page.
Once on the page, select the Covid form (and any other desired filters for time, employee etc). Below you can also filter by responses (For example you can search all Yes responses to a particular question)
On the list that returns, you can click on any particular form where it says “View Details” to see the responses. You can also generate PDFs and manually email the forms from here.
COVID-19 on the phone app
This section shows how a worker can access the form manually. This is done in cases where not all workers need to complete the form or when the mandatory form is already used for another purpose.
Click on the menu button (three horizontal lines on the top left) and then on “Forms”
Then click on “Start New Form” and select the “Covid-19 screening” form
Respond to the questions just like in any other electronic form
Finally click “Send Form” And the form will be sent to the system
Workers are able to disable GPS for the SYNCrew app in their phone settings. If they do this, the app will still work and the latest GPS location that was shared with the app will be used.
There is an easy way to see if GPS has been disabled. Click “teams” in the left navigation and you will see a circle next to each person’s name.
Green means GPS is on and updating:
Red means GPS has likely been disabled:
There are cases where GPS won’t work even if the employee has it enabled. The two most common reasons (among many) are that the phone’s GPS sensors are broken or the location settings are set in a way that prevents it from getting regular updates. You can read more about this here or contact us at support@syncrew.com with questions.
This article talks about settings that can be set for a specific worker account. If you want to see about company-wide settings for ALL workers, see this article HERE.
The system is highly configurable so if you do not see how to do what you want here, please contact us at support@syncrew.com or in the chat box at the bottom-right.
All the individual settings can be accessed clicking on Settings –> manage users, then clicking the worker’s name.
Worker Type: Worker type impacts how the app functions and is not an indicator of the worker’s position or title. Details of these types have their own article HERE.
Work.syncrew.com options: There are three options related to work.syncrew.com. There is more information about the worker portal HERE available but here is a quick summary:
Allow to view time at work.syncrew.com – This will allow a worker to go to www.syncrew.com and click “worker login” and view their hours. Since Hourly Workers and Manager Workers can easily see this in their app, this is mostly used for Managed Workers (whose time is added by others)
Allow to add time at work.syncrew.com – This will allow a worker to add time in the Worker Portal. This is most commonly used by office employees. Be sure to enable the option above for this.
“Allow to edit time at work.syncrew.com” – this final option allows the worker to edit their time from the BOTH the Worker Portal and the app directly. If you select this check box alone, the worker will only be able to edit the time from their app
Allow to upload photos from the photo gallery – Check this box to allow workers to upload progress photos from their camera’s pictures. This does NOT allow uploading photos for clock in and clock out. This is convenient for workers but since the photos are taken from the phone’s memory, SYNCrew cannot guarantee when or where they were taken and a watermark is applied to note this. If this box is NOT checked, the only way a worker can get a picture into SYNCrew is to take it in real-time with the app.
Don’t require photos: There may be some workers who you don’t want to require to take a photo at their clock in and clock out. Checking this box will make it so the worker will skip the photo at clock in and out, but they can still take progress photos and the app works identically in all other ways.
Allow user to edit their own time: If you want your employee to be able to edit their own time from the app, click the box next to “allow to edit time at work.syncrew.com”. Note this is referenced above but it’s commonly asked about and we wanted to highlight it.
Name: This is how the worker’s name will show up in the admin portal. Typically it is just the workers proper name like, “John Smith” but it sometimes has additional information like nick-names. If you with to have this field not be the property name, but need a property name to connect to payroll, you can do that by enabling the “Employee ID” field or another custom field – learn more HERE.
Email: This is the worker’s email and it’s optional since worker’s log in primarily with their phone numbers. If you do put an email address in here, they worker can also use that to log in.
Phone: This should be the worker’s cell phone number. They will use this as their primary login and they can reset their password from the app if they can get text messages at this number.
Team: Each worker is assigned to a team and this is where you set that. Learn more about teams HERE.
Skills: Each employee has skills that are a subset of the skills that a company has. You can read more about company skills HERE.
Each worker has a list of skills and must have at least one skill enabled. To change the skills, edit the list in their employee profile settings by putting a check box next to the desired skills and then click save.
If the employee only has one skill, all their work will automatically get assigned to it. If more then one skill is set up for a given employee, they will be prompted to select the appropriate skill at each clock in.
Hourly Cost rate: This is typically the employees wage but some clients put the fully-burdened rate in. This rate is used in the budgets, labor cost in Work Block reports and anywhere else labor cost is referenced.
Hourly Billing rate: This rate is shown on the project and worker profile pages – anywhere labor billable values are referenced.
Regular Hours: Start and End time are the time that this employee typically starts work. Workers will be able to work different hours than these, but these times are what the system uses for reminders to start work. These default to the values that were set in Settings –> Configuration.
To prevent workers from clocking in before their start time, go to Settings –> Configuration, scroll down to the “General” section, and then check the box next to “Enforce clock in time” (then scroll down to the bottom and click “save”).
Tolerance: This is how many minutes the system will wait before sending a notification. For example, if the worker’s start time is set to 8am and the tolerance is set to 15 minutes, the system will wait until 8:15am before sending the reminder the clock in.