After the pay period ends, it’s a best practice to have the managers review the hours and approve them. Then, once all hours are approved, lock the pay period to prevent future changes.
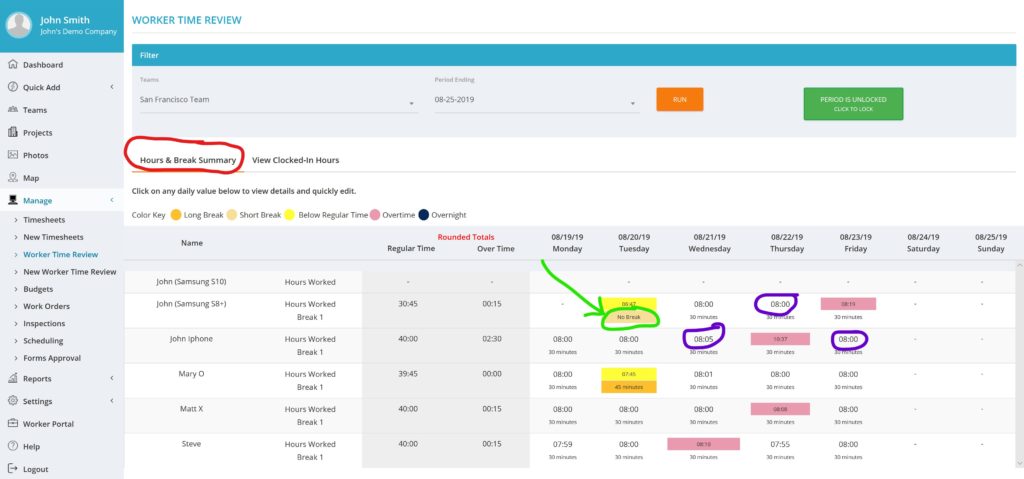
1) Review the hours in Worker Time Review
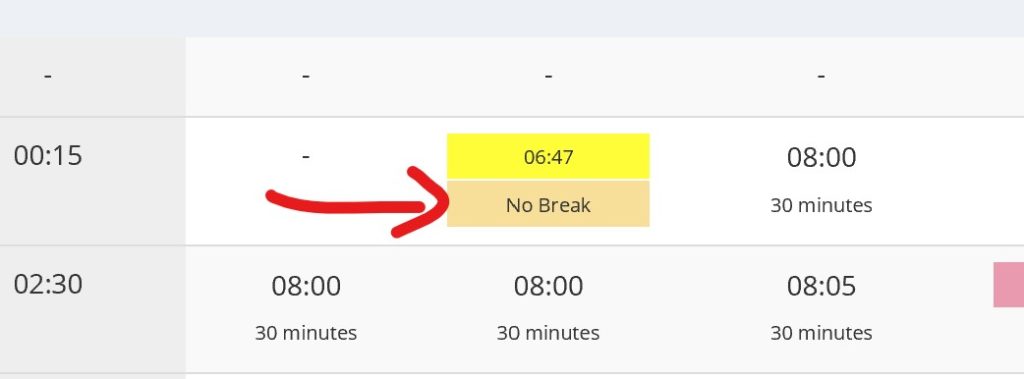
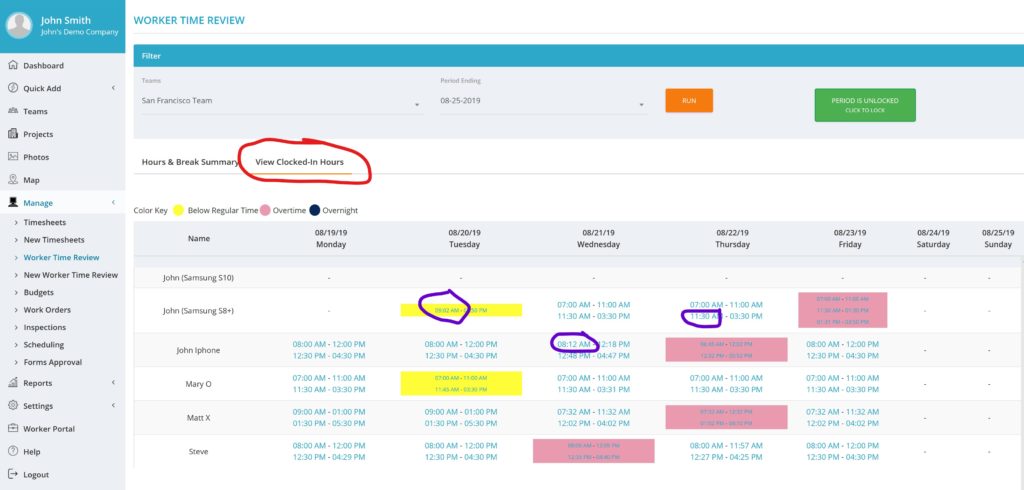
Worker Time Review can be run anytime during the pay period or after. Some managers look daily to make sure the times are always right and that comes with the added benefit that if something looks strange, the worker is likely to remember the details better since it happened yesterday, rather than last week!
This video shows how to review hours, along with all the other tricks to add and edit time.
2) Approve the hours
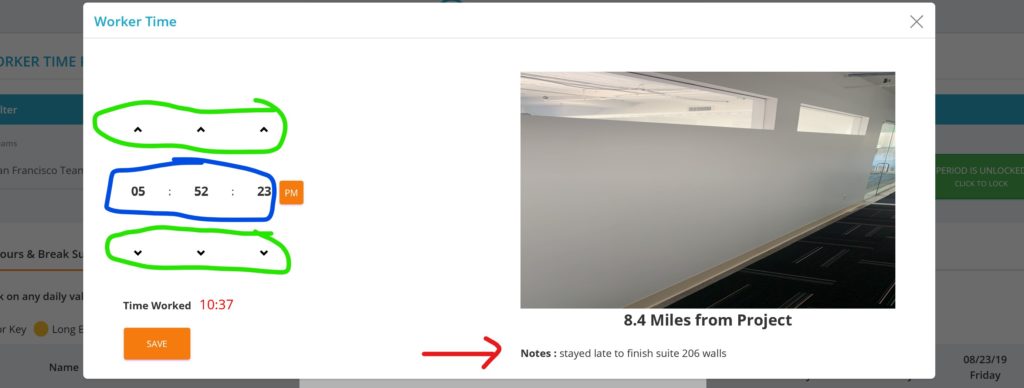
Once you review your employees’ hours, click to approve them to confirm they have been reviewed. When you click to approve them, the system saves your admin name and the time you approved them for future reference. If you edit times for a worker that was already approved, the hours become UN-approved and you will need to approve them again, so we recommend finishing your editing before approving the hours.
The video in step 1 above includes information about approving hours starting at 4:35 into the video. Click HERE to launch the video starting there.
3) Lock the pay period
After all hours are reviewed and approved, the person who runs payroll should lock the pay period. To do this, just open Worker Time Review, select the pay period, and click the Lock button shown below. Full admin will be able to edit hours or unlock the pay period but limited admin will be prevented from making edits after this so that payroll and SYNCrew will always be a perfect match.
Timesheets are a way for SYNCrew to create the trusted paper timesheets that many people still want as backup. To easily generate the timesheets, select “Manage” from the left navigation and then select “timesheets.” Then select the appropriate filters:
Which workers: The default setting that loads is all workers. But if you only want a single team or single worker, you can select that (purple box below)
Date range: The default date range is the current pay period but you can select any one you want.
Then click “Run.”
Once that runs, the a summary view will appear as shown below.
For each row, you can see the workers name, their regular and OT hours
At the far right of each row is the “approved” column where you can quickly see the status – green dot is approved, gray means nobody has approved it. If you put your mouse on top of a green dot, it will show you which admin approved the hours and when they were approved.
Click on a worker’s row to see on onscreen preview on the timesheet (purple arrow)
Click “export” at the top-right to export all the timesheets as PDFs (red arrow). This also includes a .csv file that will open in Excel or any other spreadsheet program. If you have a lot of workers, this will likely be emailed to you in a few minutes rather than downloaded.
Once you view the timesheets, you may want to see them formatted differently. To see available timesheet options, go to Settings –> Configuration and scroll down to “timesheets,” as shown below. As always, if you have any questions or trouble, please reach us at support@syncrew.com and we are happy to help!
SYNCrew allows limited and full admin to approve work hours. Approvals can be made in Worker Time Review and the the approval status is shown in both Worker Time Review and Timesheets
How to approve time
To approve time, run Worker Time Review for the period and teams you want to approve. You will see two ways to approve:
Approve all: This button will approve all time for the period for all workers on the selected teams.
Approve worker-by-worker: Along the right side of the screen are “approve” buttons. These allow you do approve a single worker at a time.
Once approved, the buttons will turn gray and you cannot press them again. See below for how to undo an approval. Additionally, please note that approvals can be made by any admin even when the period is locked.
How to undo approval of time
Once time is approved, it can be unapproved by making an edit. Once any time in the period is changed, the whole period for that worker will be unapproved. Additionally, if new time comes in from the Worker’s phone or an admin adds time, the period will become unapproved again. To approve, simply click the approve button again.
Reviewing approvals in Timesheets
The Timesheets page allows the admin to see the approvals along side the hours. In the area shown in red below, a green circle indicates that the time has been approved. Placing your mouse on the green circle will open a small pop up (highlighted in purple below) that shows the details of who approved the hours and when.
Worker Time review is the fastest way to check hours for your pay period. We recommend using Worker Time Review to quickly check how many hours your employees had each day, including overtime. Required edits can be made here, meal breaks added, missing days of job locations added and most other common changes as well.
This video is the easiest way to see how worker time review works:
Video is the easiest way to see how Worker Time Review works
How to run the Worker Time Review
Select Worker Time Review from under the Manage in the left navigation panel
On the page that loads, select your options:
Team: select the teams you want [red underline below]. You can pick one team, a few teams, or all teams. The system will remember the teams you selected last time.
Period ending: This is end date of the the pay period you want to review [green underline below]. Once you select the date, you may see a box pop up to indicate that the period is locked (more info on period lock). If you don’t see the right pay periods for your company, please email support@syncrew.com with details on your pay period cycle.
Click “Run”
After you click Run, the hours will load you can easily see each worker’s activity. There are two views and the system will remember which you used last. Neither option is better and both show mostly the same information, so have a look at both and use the one you prefer.
Hours and Break Summary View
This is the more common view since it does the math of calculating hours for you! To enter this view, make sure you click on “hours and break summary” [circled in red below].
You can see each worker’s name, total hours for the pay period and then a break down of hours on each day, with breaks taken below. There are a few tricks as well:
View Photo and edit time: By clicking on the hours worked on a given day [examples are circled in purple above], you will see all the events in that day, as shown below.
If you click on an event, you can see the photo. For example, if we click on the 5:52pm clock out above, we will see the box below. In the box below, you can see any notes the employee may have left and also make any needed edits by clicking on the arrows [circled in green below]. You can also click on the numbers [circled in blue below] to open a number pick box and prevent clicking 30 times to edit 30 minutes!
Add a break: From the hours and breaks summary view, you can also add a break on days where there is no break. To do this, click the box that says “no break” and follow the onscreen instructions.
Note that if there is already a break, but it’s not the correct duration, you can edit the start or end time of the existing break as shown above to correct the time.
View Clocked In Hours View
This view is used by people who want to see the time of the clock ins and outs. To enter this view, click on “View clocked in hours” [circled in red below].
View Photo and edit time: By clicking on any of times shown [examples are circled in purple above], it will open a box to show any notes the employee may have left and also make any needed edits by clicking on the arrows [circled in green below]. You can also click on the numbers [circled in blue below] to open a number pick box and prevent clicking 30 times to edit 30 minutes!
SYNCrew can round work time in several places. Generally, rounding of time worked is legal so long as it is done in a mechanical way and such that it does not systematically work against the employee. Where SYNCrew uses rounding, it is done in such a way that is designed to be nuetral towards time worked when viewed over long periods of time.
Starting in May of 2019, SYNCrew is shifting the way rounding is done and as we make the transition, you may see different results in different places. If you have any questions about these deiscrepancies, please email your account manager or support@syncrew.com and we will be happy to discuss details anytime. Please check back at this page to keep up to date on the transition to the new methodology. We anticipate the transition will be complete by end of Summer 2019.
NEW: Rounding of punches: SYNCrew’s new rounding methodology works as follows:
The company selects a rounding threshold of 5, 10 or 15 minutes
Clock in, Clock out, and change task events are rounded to the nearest clock time in the interval of the rounding threshold. That is, if 15 minutes is selected, all events of this kind will have minutes of :00, :15, :30, or :45. Likewise, if 10 minutes is selected for the rounding threshold, then the events will always have minutes of :00, :10, :20, :30, :40, or :50
Meal breaks will have their length rounded to the nearest threshold time. So for a company with rounding threshold set to 15 minutes, mealbreaks will always be a multiple of 15 minutes
If a worker works at multiple jobs in a given day, the time at each site ends up rounded as does the whole day
This new rounding methodology is used in the following places:
Quickbooks exports
Results for New Work Block report when option to “show rounded time” is selected (if you would like access to this beta feature, please email your request to support@syncrew.com)
OLD: Rounding of time worked: SYNCrew’s old rounding methodology works as follows:
The time worked for the day is rounded to the nearest 15 minutes
Breaks are deducted before the time worked is calculated so they are not impacted
If a worker works at multiple jobs in a given day, the time at each site is not rounded
This old rounding methodology is used in the following places:
When an employee’s current status is clocked in, an admin user can clock him/her out manually. To do this, click on the employee’s name (either in the dashboard or in the teams page) to open that employee’s profile page.
Then, click “Clock Out Worker” as shown here:
Finally, in the form that opens, just select the date and time the employee should have clocked out, input any other relevant information as required (like work order number or description of work) and click submit. The clock out will be created right away.
99% of events like clock ins, clock outs, and breaks are created by your employees and never edited. Sometimes, edits need to be made and SYNCrew keeps a log of the original times in case there is ever a reason you need to view the original times.
To see if changes have been made, follow these instructions:
Run a Work Block Report
go to the Settings menu and select “Work Block Report”
Select the person(s) and date range you want to view
Click “Run”
At the far right side of the Work Block report, you will see a column that contains either who created the event or an “Audit” button. For the rows with just text, there have been no edits made and all events are original. Additionally, you can see whether the Worker, a Manager, or an Admin user made. In the image below:
The first and last rows below have had edits made, as indicated by the “Audit” button
Rows 2 and 3 were created by a Worker (Named John iphone) on their phone and no edits have been made
Row 4 was created by an Admin user (name John Admin) and no edits have been made since
To view the edits, click on the “Audit” button to see the changed made. In the example
Example 1: start time was changed from 2:25pm to 10:25am on the same day. Note that “John Smith Admin” was the person who made the change and the change was made on 5/22/17 at 2:26pm.
Example 2: This example has two changes. The clock in time was changed from 3:13pm to 2:13pm and the start break time was changed from 3:13pm to 2:13pm. Here, John Admin made the change at 2:26pm on 5/22/17 at 2:26pm.
To view edits made to projects, users, and other settings, please contact your SYNCrew account manager or support@syncrew.com as that information is available, but not visible to you just yet.
Worker Profile Page: Fastest way to fix an issue that occurred today or yesterday. Go to teams tab, click the worker’s name and then click the “edit” button next to the event you want to edit.
SYNCrew is a management tool but it also serves as a valuable archive of all activities. As such, events cannot be deleted. In most cases, the issue can be resolved by editing the time to be a few seconds which effectively makes the time disappear. By editing, instead of deleted, the record is kept intact so that the editing history is complete and nobody can be accused of deleting information at a later date.
In certain circumstances, SYNCrew staff can delete things but it is typically limited to:
Events that were added by administrators
Events created for testing purposes by either SYNCrew or company administrators
When you need to add time to a Worker’s records because they did not or could not from their phone.
Quick Add
Click on “Quick Add” in the left navigation panel
Select “Add Worker Time”
Fill in all required fields.
You may select multiple Workers at one time
The break time you select will NOT deduct time from the time worked (example: select 8 hours worked, 30 minute break, and 8am start will create a day from 8am to 4:30pm with 30 minutes break at noon)
The system will prevent you from creating overlapping time
Click “Submit” to add the hours for the employee. If you have other hours to add, click “Submit & Add more time”.
Worker Time Review
Time can also be added easily on the worker time review page by clicking the green “+” icon on the blank day or clicking into the day and selectiong “add time before” or “add time after.” More info on Worker Time Review can be seen ON THIS PAGE.
If you have trouble: If you have trouble adding hours (typically because of overlapping time issues), please email support@syncrew.com what hours you want added and we will resolve the issue and add the hours for you.