SYNCrew Forms Overview

This article has some overview information and a video of how the forms look on the app. To jump in to how to create a form, jump over to SYNCrew Forms: How to set up.

SYNCrew Forms are a powerful way to capture information from the field. Like everything with SYNCrew, the information and photos are organized and saved forever so you can always find the form when you need it most. As always, please contact us with your needs so we can help you set up exactly the forms that will eliminate your paper-chasing!

How does it work:

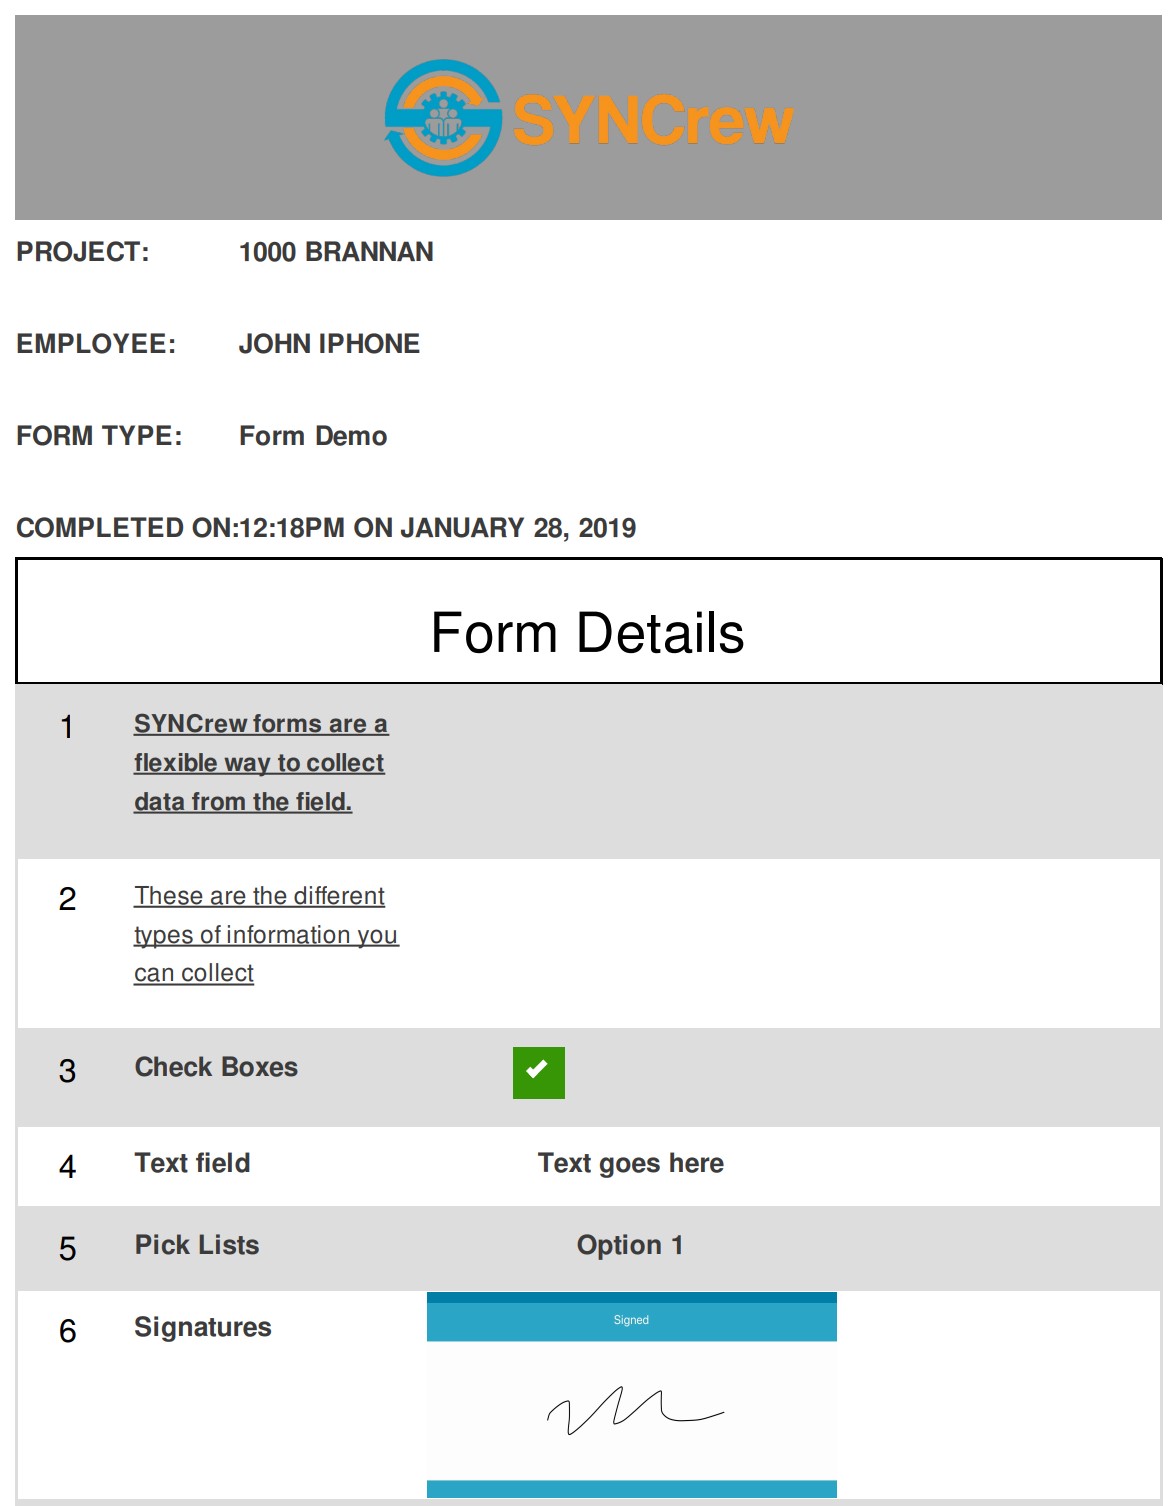
  • Set up forms: Forms are configured by an admin user (email your forms to support@syncrew.com and we’ll help set them up). You may have many different types of forms
  • Employees complete forms: Employees select which form they need to fill in and complete it on their phone
  • When a form is submitted: Once the employee submits a form, the following happens automatically:
    • Emails will be sent to contacts for the projects, emails set up for that form type
    • Forms become searchable in Reports –> Custom forms report
    • Forms and data are saved forever and can be exported to spreadsheets, pdfs, or viewed on screen

What kind of data can a form capture? Below are the types of information that can be collected and each type can be used many times in the same form

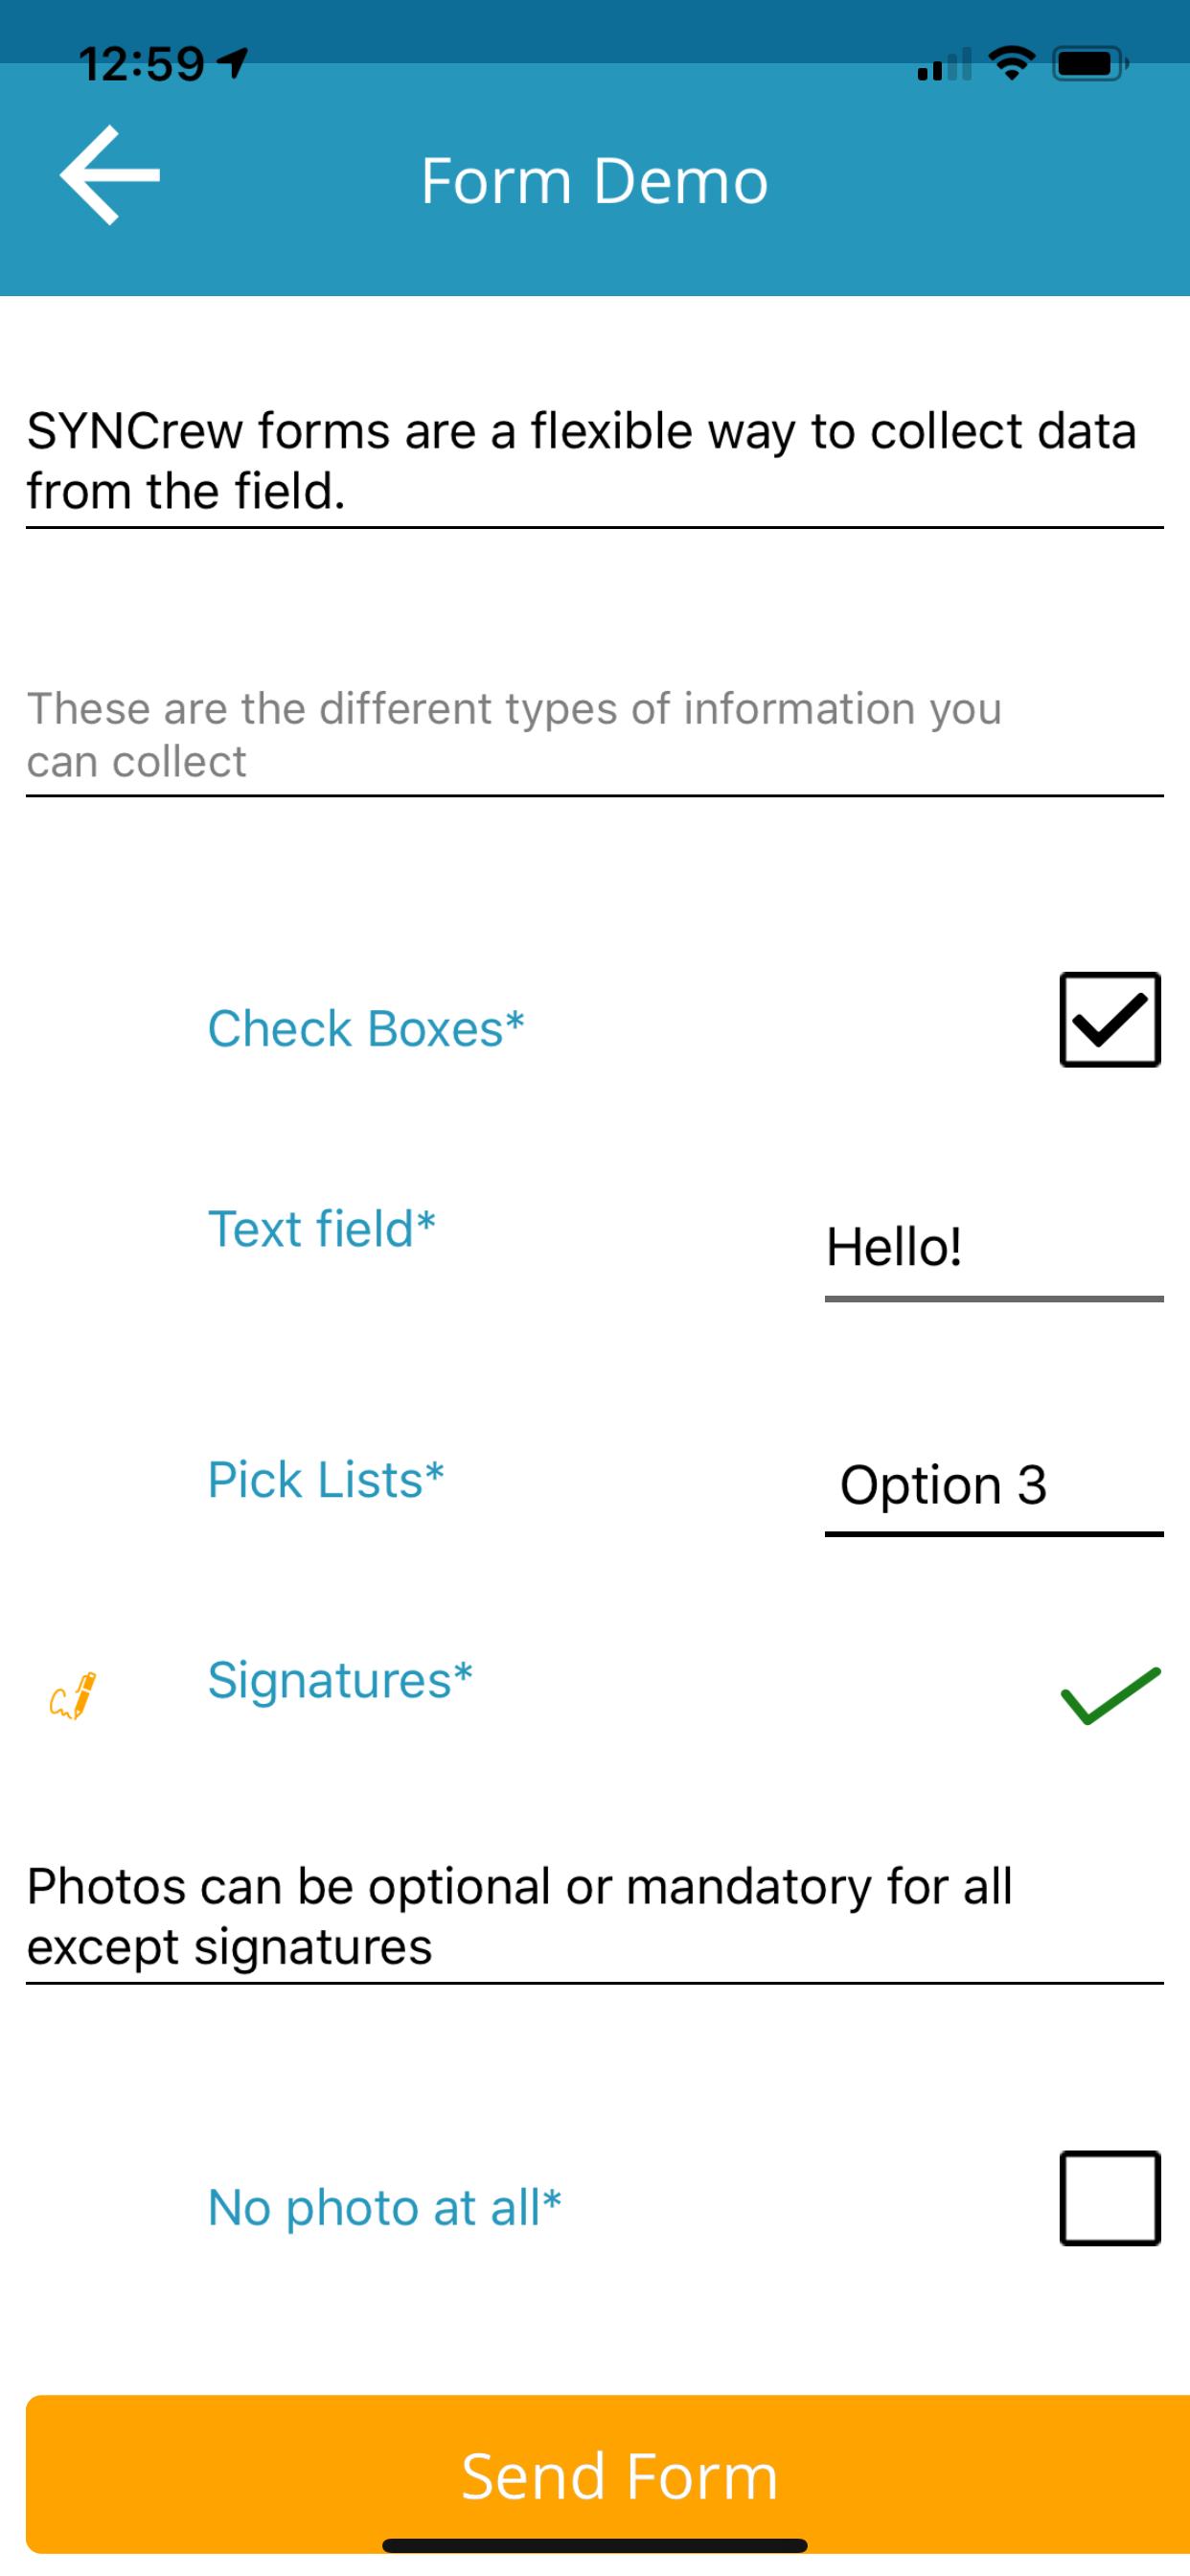
  • Signatures: Collect employee, customer, or other signatures directly in the app
  • Dates: Pick any calendar day
  • Time of Day: Pick any time of day
  • Check Boxes: The user check put a check-mark in a box (usually to mark completion of a task)
  • Text: Text or numbers can be entered
  • Pick Lists: a pre-set list of options. For short lists, all options are displayed while long lists allow you to search (2 to thousands of options supported). You may allow user to select multiple options or only one option
  • Worker List: This is like the pick list but pre-populates the list of workers in your system
  • Headings: There are two kinds of headings that can be used to group things together within the form
  • Photos: Photos can be added to any of the above data types. Photos for each item can be optional, required, or not available to take

Since the forms are 100% customizable, clients are using them for many different things and you can use it for anything you traditionally used a paper form for. Here are a few examples:

  • Customer acknowledgement of work
  • Employee vacation or sick time request
  • Material request
  • Tenant chargeback form
  • Walk-through inspection report form
  • Customer and employee signed daily work log report
  • Security company incident report form
  • Pool cleaning and chemical reading log
  • Expense reimbursement
  • Mileage reimbursement forms
  • Company phone use acknowledgement

Email your current paper form to support@syncrew.com so we can help get rid of the paper!

SYNCrew Forms: How to set up

Forms are easy to set up. To edit or create any form, click “settings” in the left navigation, then click “Custom Forms.” The following assumes you are already there.

How to create a new form:

  1. Click “New Custom Form” at the top of the page
  2. On the pop up, enter the name of the form and, optionally, one email address (you can add more emails while editing the form later)
  3. Click “Save”
  4. Now follow the steps to edit forms below

Setting up Forms

This refers to the options at the top of the forms setup page

  1. Enable: This option just enables or disables the form. If there is a check box showing, the form is enabled.
  2. Send to project email: When this option is selected, completed forms will be sent to the email(s) that are listed for the Project. You can see these emails by clicking “edit project” from the project profile page.
  3. Email address for completed form: Whenever a form is completed, these emails will receive the form.
  4. Name: This is the name that shows up on the form list in the app and admin portal
  5. Project: This setting managed when the form can be seen by workers in the field. If you want the form to appear both clocked in and out, you just need to copy the form once completed and set the copy to have different project settings
    1. Clocked in project: The form will show anytime a user is clocked into any project (as you are now)
    2. Single project: The user will see the form when they are clocked into ONLY that selected project. They will also see that form if you select “allow user to see while clocked out” AND they search for that project.
    3. Allow user to select: These forms will only be seen while the user is clocked out. 
  6. ALWAYS CLICK “UPDATE” AFTER EDITING THESE SETTINGS OR THEY WILL NOT BE SAVED

Adding and editing form fields

This section shows how to add data elements to forms and change the options for photo requirements and reordering

To add a new element:

  1. Scroll to the bottom of the page where you will see a drop-down menu and submit button (circled in green in the image above)
  2. Click the menu and select the option you want. You can read the various field types at this page: http://www.syncrew.com/faq/app/syncrew-forms-overview/
  3. Click “submit”
  4. A form will open where you need to put some text in the Label. This label is what will show on the form and each label on a form needs a unique name. Click “Save” once you complete the label.

Editing a data element: Click the “edit” button next to the label, at the right site of screen. Make whatever edits you desire in the pop up and click Save. One trick for elements that have lists (like “pick lists”) is that you can enter multiple items at one time separated by commas. So “Option1, Option2, Option3” will create three separate options.

Changing Order: The screen shows the elements in the order they will appear on the Worker app and also on emails and PDFs. To cahnge the order, click the blue up or down arrow at the far right of the element. This will cause the element to move by one slot in the list. To go multiple spaces, just click the button multiple times.

Removing a data element: Simply click the “remove” button next to the element you with to remove. Once removed, the element will no longer show up on newly completed forms but it will be there for forms that were completed before it was removed.

If you have any trouble, please contact your account manager or support@syncrew.com

Other links: