SYNCrew has many different options that can be configured. General information about these options can be found here, but please contact your account manager or our support team if you have any questions
Project Labels are a way to group different projects together, sort of like a folder except that a project can have more than one group applied. These are visible to admin only, so workers are not aware of them from the app.
How to turn on Labels:
To enable Project Labels, go to Settings –> Configuration and then scroll down to the section labeled “Projects.” The configure your options as shown in the image below:
Where Project Labels show up in the app
On Project overview page (click “Projects” in left-navigation). You can filter for Project Labels at the top of this page.
On the Project profile page, this Project Label is visible in the info area at the top, left.
Filter for Project Label in Work Block Reports. There is a simple filter for Project Label in the filters.
Work Block report results. If you selected the option to “show in reporting,” you will also see an additional column in the Work Block report that shows the Project Label for that row’s work block.
This article talks about settings that can be set for a specific worker account. If you want to see about company-wide settings for ALL workers, see this article HERE.
The system is highly configurable so if you do not see how to do what you want here, please contact us at support@syncrew.com or in the chat box at the bottom-right.
All the individual settings can be accessed clicking on Settings –> manage users, then clicking the worker’s name.
Worker Type: Worker type impacts how the app functions and is not an indicator of the worker’s position or title. Details of these types have their own article HERE.
Work.syncrew.com options: There are three options related to work.syncrew.com. There is more information about the worker portal HERE available but here is a quick summary:
Allow to view time at work.syncrew.com – This will allow a worker to go to www.syncrew.com and click “worker login” and view their hours. Since Hourly Workers and Manager Workers can easily see this in their app, this is mostly used for Managed Workers (whose time is added by others)
Allow to add time at work.syncrew.com – This will allow a worker to add time in the Worker Portal. This is most commonly used by office employees. Be sure to enable the option above for this.
“Allow to edit time at work.syncrew.com” – this final option allows the worker to edit their time from the BOTH the Worker Portal and the app directly. If you select this check box alone, the worker will only be able to edit the time from their app
Allow to upload photos from the photo gallery – Check this box to allow workers to upload progress photos from their camera’s pictures. This does NOT allow uploading photos for clock in and clock out. This is convenient for workers but since the photos are taken from the phone’s memory, SYNCrew cannot guarantee when or where they were taken and a watermark is applied to note this. If this box is NOT checked, the only way a worker can get a picture into SYNCrew is to take it in real-time with the app.
Don’t require photos: There may be some workers who you don’t want to require to take a photo at their clock in and clock out. Checking this box will make it so the worker will skip the photo at clock in and out, but they can still take progress photos and the app works identically in all other ways.
Allow user to edit their own time: If you want your employee to be able to edit their own time from the app, click the box next to “allow to edit time at work.syncrew.com”. Note this is referenced above but it’s commonly asked about and we wanted to highlight it.
Name: This is how the worker’s name will show up in the admin portal. Typically it is just the workers proper name like, “John Smith” but it sometimes has additional information like nick-names. If you with to have this field not be the property name, but need a property name to connect to payroll, you can do that by enabling the “Employee ID” field or another custom field – learn more HERE.
Email: This is the worker’s email and it’s optional since worker’s log in primarily with their phone numbers. If you do put an email address in here, they worker can also use that to log in.
Phone: This should be the worker’s cell phone number. They will use this as their primary login and they can reset their password from the app if they can get text messages at this number.
Team: Each worker is assigned to a team and this is where you set that. Learn more about teams HERE.
Skills: Each employee has skills that are a subset of the skills that a company has. You can read more about company skills HERE.
Each worker has a list of skills and must have at least one skill enabled. To change the skills, edit the list in their employee profile settings by putting a check box next to the desired skills and then click save.
If the employee only has one skill, all their work will automatically get assigned to it. If more then one skill is set up for a given employee, they will be prompted to select the appropriate skill at each clock in.
Hourly Cost rate: This is typically the employees wage but some clients put the fully-burdened rate in. This rate is used in the budgets, labor cost in Work Block reports and anywhere else labor cost is referenced.
Hourly Billing rate: This rate is shown on the project and worker profile pages – anywhere labor billable values are referenced.
Regular Hours: Start and End time are the time that this employee typically starts work. Workers will be able to work different hours than these, but these times are what the system uses for reminders to start work. These default to the values that were set in Settings –> Configuration.
To prevent workers from clocking in before their start time, go to Settings –> Configuration, scroll down to the “General” section, and then check the box next to “Enforce clock in time” (then scroll down to the bottom and click “save”).
Tolerance: This is how many minutes the system will wait before sending a notification. For example, if the worker’s start time is set to 8am and the tolerance is set to 15 minutes, the system will wait until 8:15am before sending the reminder the clock in.
Every event in SYNCrew has a “Skill” associated with it. The information below explains how to enable skills for your company first and then for each employee.
Company enabled skills
Each company must have at least one enabled and can have as many as they wish. To make skills available for your company, go to Settings in the left navigation panel and then select “update skills.” That will show you the list of all SYNCrew skills and you just need to click the box to the left of any skill you want and click “Update” to save.
SYNCrew has hundreds of skills available. You can view the list by going to “Settings” in the left navigation panel, then selecting “Update Skills.” If you need a skill that is not available in the list, please email support@syncrew.com to request a new skill and they can typically be added quickly.
Worker enabled Skills
Each worker has a list of skills and must have at least one skill enabled. To change the skills, edit the list in their employee profile settings by putting a check box next to the desired skills and then click save.
If the employee only has one skill, all their work will automatically get assigned to it. If more then one skill is set up for a given employee, they will be prompted to select the appropriate skill at each clock in.
Project-Specific Skills
The worker enabled skills above can be over-ridden by location-specific skills list. To enable that, go to the project edit screen and scroll down until you see a check box next to “use location skills list”. Check that box and you will see your company’s enabled skills appear below. Select the skills you want workers to be able to select from the list and save the project settings. Once you have a location-based skills list for a project, workers will see ONLY that list of skills when they clock in there, regardless of what their own list looks like.
Skill-based Account Name
You can make the accounting name change based on the selected skill for certain projects. This is described in the “accounting name” section of the Project Settings article you can find HERE.
Option 1: Share projects:This option is for when BOTH companies are clients of SYNCrew and lets one company see everything from the other company at shared projects only (work at non-shared projects remain private). This is often more information then either party wants, but it can be very useful depending on the project.
To set this up, we connect two companies and then one company (usually the “General Contractor”) would “share” the project with the other (we’ll call it the “sub-contractor” here). Everything looks the same in the sub-contractor’s portal except that the projects will be “owned” by the other. The magic here is that all the info shows up in General Contractors portal just as it does in Sub-Contractors’. Specifically, the General Contractor would see:
When a Sub-Contractor employee clocks in, out, or takes a progress picture
General Contractor can run reports as they would with their regular employees
General Contractor can search photos and notes
Again, the General Contractor CANNOT see work that Sub-Contractor employees do at other projects that are not shared. The Sub-Contractor employees will basically disappear from General Contractor’s view if they do work for other clients
Option 2: Set up limited admin accounts: This requires no real setup and is typically used when a SYNCrew client wants to provide access to a client of theirs for just one or a few of their projects. To set this up, just create a Limited Admin account for the person you want to be able to see and configure that admin with the appropriate access. Limited admin accounts can be set up in many ways and you can consult this article or contact SYNCrew support for help.
Option 3: Email progress pictures taken by managers:This requires no real setup either. SYNCrew has many ways to share photos which may assist in sharing data:
Photos can be manually sent from the app at Change Task or Clock Out. The app user can just enter the email address then and all photos taken at the time will send
Rules can be set up so photos that meet certain criteria can be sent automatically to pre-specificied email addresses
Most SYNCrew users use the app in the field, but many companies have at least a few people in the office and want to have them log hours in SYNCrew as well. This feature allows those users to add hours from a web browser.
Enable Access
Access to the Worker Portal is on a worker-by-worker basis so you can enable only for those who need it. To enable access, go to their worker profile in the Admin section and check the boxes circled to allow the appropriate level of access for that user. Click Save.
If the Worker is ALSO an admin user, you can link the accounts together. Doing this will allow them to log into the admin portal and quickly go to their worker portal by going to the menu shown at right so they can manage their own hours.
To set up this connection, go to the person’s admin account and click “Link worker.” Then search for their worker account and click save.
How to use
Once a Worker is set up, they can access the portal by going to www.syncrew.com and clicking “employee login” at the top-right. Then they log in with the same phone number and password they use to log into the app. You can reset it for them if they have forgotten it.
Once they log in, they will have several options (these can vary a bit based on the level of access provided in their settings). They can track in real-time, add time in the past, or edit past hours.
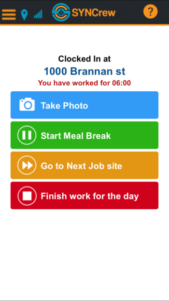
Track in Live Time: Some users will want to track hours as they work. To do that, they can select the project and skill (circled in red below) and click “start working.” The screen will then show a clock for how long they have been at work and they can change task, clock out, or even upload a photo.
Add past time: The easiest way to add past time is to do it while clocked out. When the user is clocked out, they will see the information and buttons circled at the bottom of the screen shown below.
To add time, pick the day you want to add by clicking on the blue box with the date. To see a different week, click the arrows to the left or right of the blue boxes to go to the next week. Once you have the day selected, pick the project, skill (plus any optional fields your company has), select the number hours and minutes for that task. Once that is complete, click one of the buttons to add the hours:
Add hours in beginning: Adds hours before the earliest event. For example, if the hours currently show 9am to 3pm, using this option to add an hour will add the time from 8am to 9am.
Add hours at end: Adds hours at the end of the currently entered hours. In the example above, this hour would be added from 3pm to 4pm.
You can enter more time by following the same process.
Edit time: Sometimes time needs to be edited after the fact. Doing so can be done for prior days only (so you cannot do this “today”). To edit the time, simply click on the time shown in the “Total” colum (circled in red below) and change the time in the pop-over that opens.
SYNCrew was designed to allow for an unlimited number of projects. Since the app uses GPS to always show the nearest projects at the top of the list, you could have 10,000 projects in a single city and each worker would always see the one they are near!
Even so, many people like to keep their project lists clean which is certainly a noble goal! When you do not expect any more work to be done at a project, you can disable it. A disabled project will not show up on the worker app so they will not be able to clock into that project anymore. All work associated with the project still exists and can be searched for.
To disable a project: Go to Settings –> Manage projects. Then click the “make inactive” button next to the project. If you have a lot of projects, use the search bar to find the one(s) you want to inactivate. 0
In the event that you need to re-enable a project, you can search for it and click to enable it, just as we disabled the example above.
A note on deleting projects: Since projects usually have work connected to them, the system does not allow projects to be deleted. If work never commenced you can just inactivate them or rename the project to a new one (although we do not recommend renaming projects as you may do it by mistake and it will impact any work that was associated with that project).
Occasionally, it will be convenient to export a list of Worker Users or a list of current projects. To do so, follow these steps:
Click “Settings” in the navigation panel at the left, then select “Export” in the sub-menu that opens
For both Workers and Projects, there is a menu to select whether you want to see ALL, ACTIVE, or INACTIVE
Once you pick which group, click the appropriate “export” button for what you want to export. A CSV file will download immediately and this file can be opened in your text editor or spreadsheet program (typically Excel)
The screenshot below shows how to export INACTIVE PROJECTS:
When you create an admin user, you have the option to create a Full Admin or a Limited Admin. If you have questions about who should have what kind of admin login, please contact your account manager our our support team to discuss the details of your company’s situation.
Full Admin: A Full Admin can do and change everything. For small companies, it is usual for everybody to be a full admin.
Parent Admin: This is a special kind of admin that companies with multiple SYNCrew locations have. They are effectively Full Admin who can switch between locations.
Limited Admin: A Limited Admin is exactly what the name says, limited in the following ways:
No Admin Access: No Limited Admin may access the “Admin” tab to edit settings, add/remove users, add/remove projects
Options: Depending on your goals, the limited admin can be further edited as follows: Full Report Access: By default, limited admin can run reports but will only see data from projects they have access to. There is an option to make them able to see report data for
Disable Editing Privileges: By default, a Limited Admin can edit data they can see. You may disable their editing privileges so they can not make edits. This effectively makes them a “view only” user
Disable Manage Menu: By default, limited admin users can access the manage menu. Clicking this option prevents the limited admin from seeing the menu or accessing its features (timesheets, worker time review, etc.)
Project Type: By default, limited admin can see all projects. If you select the option “Limited Projects” in this menu, you can then pick which projects this admin can see. Some companies use this to give their clients access to view activity for just that client’s locations. Others use this to make it easier for managers to see only the projects they are managing
Full Report Access: This option does two things:
1) If projects are limited as described above, then this will allow the Limited Admin to run reports across all projects
2) This allows Limited Admin to access Timesheets in the manage menu
Quick Add Menu: By default, Limited Admin do not have access to the Quick Add menu in the left-navigation. You can enable a Limited Admin to be able to add worker time OR add projects OR new workers (or any combination of the three). If none is selected, the Quick Add menu will not be shown to the Limited Admin
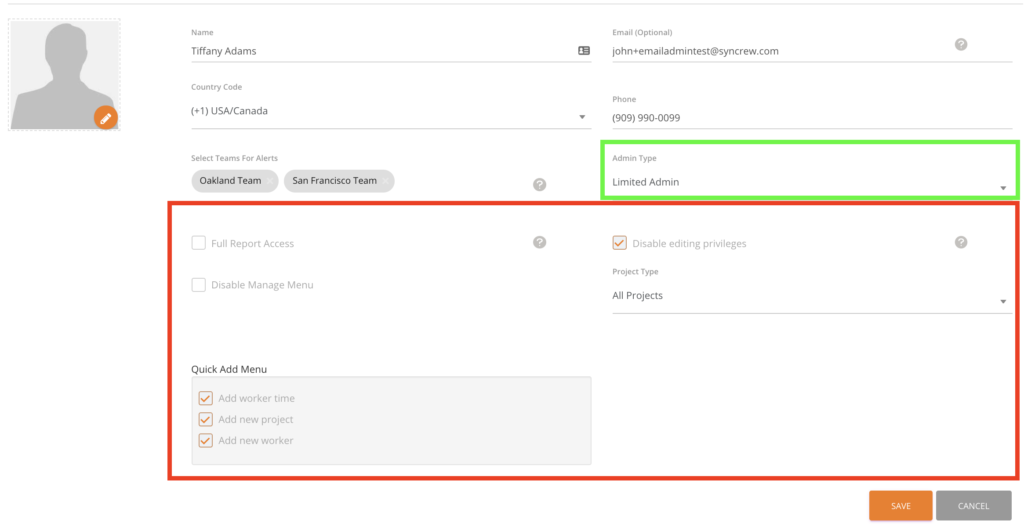
Here are the options you will see once you toggle an Admin user to be a Limited Admin:
Shown in green below is where you select whether a user should be a full or limited admin
Shown in red below are the options for a limited admin
The “Manager Worker” is a user type for onsite managers who need to add time for other employees. They manage their own time as they go (just like an Hourly Worker) and then they can add time for any Managed Worker. Note that Managers are NOT able to add hours for Hourly Workers, Non-Hourly Workers, or other Managers.
Manage their own time: Most Manager users start their day by clocking in, taking breaks, and snapping photos.
Add hours for others:
Identical time to their own: Each time they clock out or change task, they have the opportunity to add time for others. As they clock out, the app will ask who worked with them and the Manager can then select as many Managed Workers as they had that day.
Add any other hours: The Manager can add hours for Managed Workers who worked at a different project, performed a different skill, or worked different hours. By using the “add time” option from the menu, these hours can be added from the app in just a few seconds.
“Managed Worker” accounts are for employees who do not use the app and have their hours entered by an administrator or a Manager Worker. They are not able to log into the SYNCrew app to take photos or log hours. They may be given a login to the Worker Portal where they can view their hours and the system is able to generate timesheets for them. Because these users do not need to log in, the only information required to create an account is their name.
All Manager Workers and Admin users can create hours for any Managed Worker.


