Rounding of time

Updated 5/25/19

SYNCrew can round work time in several places. Generally, rounding of time worked is legal so long as it is done in a mechanical way and such that it does not systematically work against the employee. Where SYNCrew uses rounding, it is done in such a way that is designed to be nuetral towards time worked when viewed over long periods of time.

Starting in May of 2019, SYNCrew is shifting the way rounding is done and as we make the transition, you may see different results in different places. If you have any questions about these deiscrepancies, please email your account manager or support@syncrew.com and we will be happy to discuss details anytime. Please check back at this page to keep up to date on the transition to the new methodology. We anticipate the transition will be complete by end of Summer 2019.

NEW: Rounding of punches:  SYNCrew’s new rounding methodology works as follows:

  • The company selects a rounding threshold of 5, 10 or 15 minutes
  • Clock in, Clock out, and change task events are rounded to the nearest clock time in the interval of the rounding threshold. That is, if 15 minutes is selected, all events of this kind will have minutes of :00, :15, :30, or :45. Likewise, if 10 minutes is selected for the rounding threshold, then the events will always have minutes of :00, :10, :20, :30, :40, or :50
  • Meal breaks will have their length rounded to the nearest threshold time. So for a company with rounding threshold set to 15 minutes, mealbreaks will always be a multiple of 15 minutes
  • If a worker works at multiple jobs in a given day, the time at each site ends up rounded as does the whole day

This new rounding methodology is used in the following places:

  • Quickbooks exports
  • Results for New Work Block report when option to “show rounded time” is selected (if you would like access to this beta feature, please email your request to support@syncrew.com)

OLD: Rounding of time worked:  SYNCrew’s old rounding methodology works as follows:

  • The time worked for the day is rounded to the nearest 15 minutes
  • Breaks are deducted before the time worked is calculated so they are not impacted
  • If a worker works at multiple jobs in a given day, the time at each site is not rounded

This old rounding methodology is used in the following places:

  • Timesheets (when rounding is selected)
  • Worker Time Review (when rounding is selected)

Admin access on mobile phone (in app or browser)

Admin users can use the admin portal on their phones two ways:

  1. Download the SYNCrew app from your phone’s app store and log in with your admin credentials
  2. Open your phone’s web browser and go to https://app.syncrew.com

If you have BOTH a worker and admin users with the same credentials (email and password), the app will prioritize the worker account and log you in to that. To resolve that, you can either log into the admin portal using option 2 above or use a different email address for your worker and admin accounts.

If you have any trouble with this, please contact support@syncrew.com and we can review your accounts and help you sort things out.

Sharing data between companies

Option 1: Share projects: This option is for when BOTH companies are clients of SYNCrew and lets one company see everything from the other company at shared projects only (work at non-shared projects remain private). This is often more information then either party wants, but it can be very useful depending on the project. 

To set this up, we connect two companies and then one company (usually the “General Contractor”) would “share” the project with the other (we’ll call it the “sub-contractor” here). Everything looks the same in the sub-contractor’s portal except that the projects will be “owned” by the other. The magic here is that all the info shows up in General Contractors portal just as it does in Sub-Contractors’. Specifically, the General Contractor would see:

  • When a Sub-Contractor employee clocks in, out, or takes a progress picture
  • General Contractor can run reports as they would with their regular employees
  • General Contractor can search photos and notes
  • Again, the General Contractor CANNOT see work that Sub-Contractor employees do at other projects that are not shared. The Sub-Contractor employees will basically disappear from General Contractor’s view if they do work for other clients

Option 2: Set up limited admin accounts: This requires no real setup and is typically used when a SYNCrew client wants to provide access to a client of theirs for just one or a few of their projects. To set this up, just create a Limited Admin account for the person you want to be able to see and configure that admin with the appropriate access. Limited admin accounts can be set up in many ways and you can consult this article or contact SYNCrew support for help.

Option 3: Email progress pictures taken by managers: This requires no real setup either. SYNCrew has many ways to share photos which may assist in sharing data:

  • Photos can be manually sent from the app at Change Task or Clock Out. The app user can just enter the email address then and all photos taken at the time will send
  • Rules can be set up so photos that meet certain criteria can be sent automatically to pre-specificied email addresses
  • Reports: Some reports including Work Block reports and Daily Site reports can be emailed automatically or manually (varies by report)

Worker Portal

Most SYNCrew users use the app in the field, but many companies have at least a few people in the office and want to have them log hours in SYNCrew as well. This feature allows those users to add hours from a web browser.

Enable Access

Access to the Worker Portal is on a worker-by-worker basis so you can enable only for those who need it. To enable access, go to their worker profile in the Admin section and check the boxes circled to allow the appropriate level of access for that user. Click Save.

If the Worker is ALSO an admin user, you can link the accounts together. Doing this will allow them to log into the admin portal and quickly go to their worker portal by going to the menu shown at right so they can manage their own hours.

To set up this connection, go to the person’s admin account and click “Link worker.” Then search for their worker account and click save.

How to use

Once a Worker is set up, they can access the portal by going to www.syncrew.com and clicking “employee login” at the top-right. Then they log in with the same phone number and password they use to log into the app. You can reset it for them if they have forgotten it.

Once they log in, they will have several options (these can vary a bit based on the level of access provided in their settings). They can track in real-time, add time in the past, or edit past hours.

Track in Live Time: Some users will want to track hours as they work. To do that, they can select the project and skill (circled in red below) and click “start working.” The screen will then show a clock for how long they have been at work and they can change task, clock out, or even upload a photo.

Add past time: The easiest way to add past time is to do it while clocked out. When the user is clocked out, they will see the information and buttons circled at the bottom of the screen shown below.

To add time, pick the day you want to add by clicking on the blue box with the date. To see a different week, click the arrows to the left or right of the blue boxes to go to the next week. Once you have the day selected, pick the project, skill (plus any optional fields your company has), select the number hours and minutes for that task. Once that is complete, click one of the buttons to add the hours:

  • Add hours in beginning: Adds hours before the earliest event. For example, if the hours currently show 9am to 3pm, using this option to add an hour will add the time from 8am to 9am.
  • Add hours at end: Adds hours at the end of the currently entered hours. In the example above, this hour would be added from 3pm to 4pm.

You can enter more time by following the same process.

Edit time: Sometimes time needs to be edited after the fact. Doing so can be done for prior days only (so you cannot do this “today”). To edit the time, simply click on the time shown in the “Total” colum (circled in red below) and change the time in the pop-over that opens.

SYNCrew Forms Overview

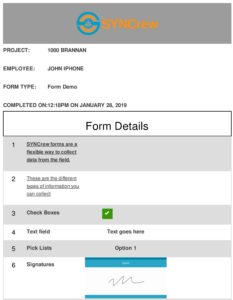
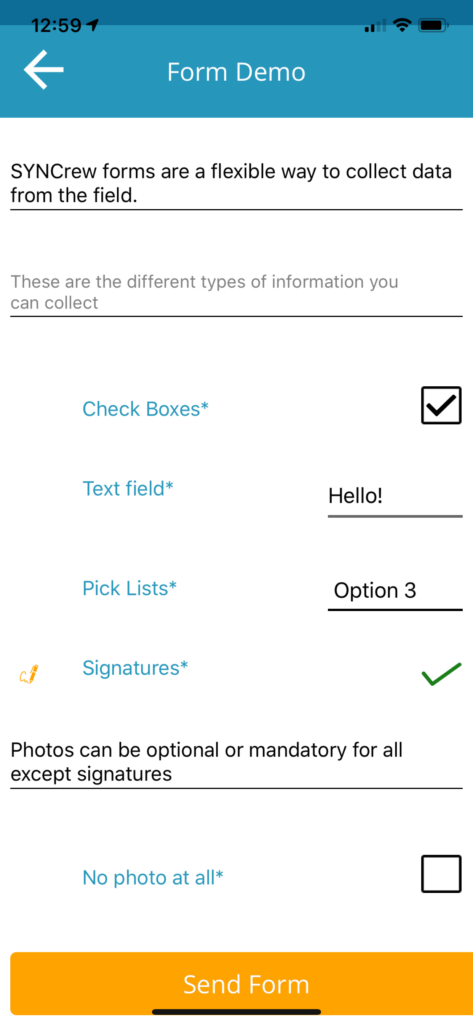
This article has some overview information and a video of how the forms look on the app. To jump in to how to create a form, jump over to SYNCrew Forms: How to set up.

SYNCrew Forms are a powerful way to capture information from the field. Like everything with SYNCrew, the information and photos are organized and saved forever so you can always find the form when you need it most. As always, please contact us with your needs so we can help you set up exactly the forms that will eliminate your paper-chasing!

How does it work:

  • Set up forms: Forms are configured by an admin user (email your forms to support@syncrew.com and we’ll help set them up). You may have many different types of forms
  • Employees complete forms: Employees select which form they need to fill in and complete it on their phone
  • When a form is submitted: Once the employee submits a form, the following happens automatically:
    • Emails will be sent to contacts for the projects, emails set up for that form type
    • Forms become searchable in Reports –> Custom forms report
    • Forms and data are saved forever and can be exported to spreadsheets, pdfs, or viewed on screen

What kind of data can a form capture? Below are the types of information that can be collected and each type can be used many times in the same form

  • Signatures: Collect employee, customer, or other signatures directly in the app
  • Dates: Pick any calendar day
  • Time of Day: Pick any time of day
  • Check Boxes: The user check put a check-mark in a box (usually to mark completion of a task)
  • Text: Text or numbers can be entered
  • Pick Lists: a pre-set list of options. For short lists, all options are displayed while long lists allow you to search (2 to thousands of options supported). You may allow user to select multiple options or only one option
  • Worker List: This is like the pick list but pre-populates the list of workers in your system
  • Headings: There are two kinds of headings that can be used to group things together within the form
  • Photos: Photos can be added to any of the above data types. Photos for each item can be optional, required, or not available to take

Since the forms are 100% customizable, clients are using them for many different things and you can use it for anything you traditionally used a paper form for. Here are a few examples:

  • Customer acknowledgement of work
  • Employee vacation or sick time request
  • Material request
  • Tenant chargeback form
  • Walk-through inspection report form
  • Customer and employee signed daily work log report
  • Security company incident report form
  • Pool cleaning and chemical reading log
  • Expense reimbursement
  • Mileage reimbursement forms
  • Company phone use acknowledgement

Email your current paper form to support@syncrew.com so we can help get rid of the paper!

SYNCrew Forms: How to set up

Forms are easy to set up. To edit or create any form, click “settings” in the left navigation, then click “Custom Forms.” The following assumes you are already there.

How to create a new form:

  1. Click “New Custom Form” at the top of the page
  2. On the pop up, enter the name of the form and, optionally, one email address (you can add more emails while editing the form later)
  3. Click “Save”
  4. Now follow the steps to edit forms below

Setting up Forms

This refers to the options at the top of the forms setup page

  1. Enable: This option just enables or disables the form. If there is a check box showing, the form is enabled.
  2. Send to project email: When this option is selected, completed forms will be sent to the email(s) that are listed for the Project. You can see these emails by clicking “edit project” from the project profile page.
  3. Email address for completed form: Whenever a form is completed, these emails will receive the form.
  4. Name: This is the name that shows up on the form list in the app and admin portal
  5. Project: This setting managed when the form can be seen by workers in the field. If you want the form to appear both clocked in and out, you just need to copy the form once completed and set the copy to have different project settings
    1. Clocked in project: The form will show anytime a user is clocked into any project (as you are now)
    2. Single project: The user will see the form when they are clocked into ONLY that selected project. They will also see that form if you select “allow user to see while clocked out” AND they search for that project.
    3. Allow user to select: These forms will only be seen while the user is clocked out. 
  6. ALWAYS CLICK “UPDATE” AFTER EDITING THESE SETTINGS OR THEY WILL NOT BE SAVED

Adding and editing form fields

This section shows how to add data elements to forms and change the options for photo requirements and reordering

To add a new element:

  1. Scroll to the bottom of the page where you will see a drop-down menu and submit button (circled in green in the image above)
  2. Click the menu and select the option you want. You can read the various field types at this page: http://www.syncrew.com/faq/app/syncrew-forms-overview/
  3. Click “submit”
  4. A form will open where you need to put some text in the Label. This label is what will show on the form and each label on a form needs a unique name. Click “Save” once you complete the label.

Editing a data element: Click the “edit” button next to the label, at the right site of screen. Make whatever edits you desire in the pop up and click Save. One trick for elements that have lists (like “pick lists”) is that you can enter multiple items at one time separated by commas. So “Option1, Option2, Option3” will create three separate options.

Changing Order: The screen shows the elements in the order they will appear on the Worker app and also on emails and PDFs. To cahnge the order, click the blue up or down arrow at the far right of the element. This will cause the element to move by one slot in the list. To go multiple spaces, just click the button multiple times.

Removing a data element: Simply click the “remove” button next to the element you with to remove. Once removed, the element will no longer show up on newly completed forms but it will be there for forms that were completed before it was removed.

If you have any trouble, please contact your account manager or support@syncrew.com

Other links:

Importing Projects

If you want to add more then a few projects, it can be easier to add with our import tool. If you just want to add a single project, see here.

1) Go to Settings in the left navigation and select “Import”

2) Select “Projects” to import from the menu at the top-right

3) On the next page that loads, click the icon next to Select CSV (circled in red below). It will open your computers file system to select the file you wish to import. Then click “Start import.” You can also click to download a header file if you need (circled in green).

4) The next screen will show you all the projects you are loading. You can update any addresses that did not map as you expected by updating the addresses or moving the pin on the map. You can also delete a location by clicking the red “X”

5) Once you review everything, scroll to the very bottom and click “Finalize import”

Quickbooks integration: Common causes of errors

Below are some issues we have seen on multiple occasions so we posted there in case you are having a similar issue.

EXTRA SPACES: Spaces in SYNCrew Accounting Name field. This is the most common issue we see. Clients will enter a space at the front or back of the field, or before or after the “:” that is used to break up the Project and Job. If you suspect this is the issue, contact support@syncrew.com and we can run a quick audit to check for this.


SAME ACCOUNTING NAME ON TWO PROJECTS: For the integration to work and prevent duplicate entries from being made into Quickbooks, each project in SYNCrew must have a unique Accounting Name (or Project Name if you are using that in your QB Sync settings).

MIDDLE NAME MIS-MATCH: Too many letters stored in the middle initial field in Quickbooks. This is a strange one but has popped up a few times and is hard to track down. The Middle Initial field in QB can only hold 5 characters but sometimes multiple names will get put in there. In the examples below, you can see that “Robinson” is the second, first name in SYNCrew, but just Robin fits in QB.

This particular problem will allow the Work Block to be written into QB, but it will NOT be confirmed within SYNCrew and re-running Web Connector will cause duplicate entries to be made.

Pre-Start: Getting SYNCrew set up


1) Add projects:
 You can email us a list of addresses to import for you or you can click the link to see how to add directly. Add Projects


2) Add employees: You can email us a list of names and cell phone numbers so we can add, or you can click the link to see how to add users directly. Please note that worker accounts will receive a text message with login info as soon as you create the account so let your team know its coming and please don’t do in the middle of the night! Add users


3) Pick a start date: We recommend a few days before the start of your next payroll so your crew can install the app and try it out. If they have any trouble, they can reach us at 415-968-1593 for help. On the first day, we recommend sending a text to each employee reminding them to get started! If you share the start date with us, we’ll check in on everything as well!

4) Get started and let us know how things are going! If you have any trouble or questions, you can reach us at the info below or check out our help website HERE.

Officially open 8am to 5pm Pacific time, but text or email outside those hours are often answered when urgent. Please note that mornings and lunch time are the highest call times so please just leave a message and we’ll always get back to you within a few minutes.

How to disable a project (delete a project)

SYNCrew was designed to allow for an unlimited number of projects. Since the app uses GPS to always show the nearest projects at the top of the list, you could have 10,000 projects in a single city and each worker would always see the one they are near!

Even so, many people like to keep their project lists clean which is certainly a noble goal! When you do not expect any more work to be done at a project, you can disable it. A disabled project will not show up on the worker app so they will not be able to clock into that project anymore. All work associated with the project still exists and can be searched for.

To disable a project: Go to Settings –> Manage projects. Then click the “make inactive” button next to the project. If you have a lot of projects, use the search bar to find the one(s) you want to inactivate. 0

In the event that you need to re-enable a project, you can search for it and click to enable it, just as we disabled the example above.

A note on deleting projects: Since projects usually have work connected to them, the system does not allow projects to be deleted. If work never commenced you can just inactivate them or rename the project to a new one (although we do not recommend renaming projects as you may do it by mistake and it will impact any work that was associated with that project).