Worker Type: Manager

The “Manager Worker” is a user type for onsite managers who need to add time for other employees. They manage their own time as they go (just like an Hourly Worker) and then they can add time for any Managed Worker. Note that Managers are NOT able to add hours for Hourly Workers, Non-Hourly Workers, or other Managers.

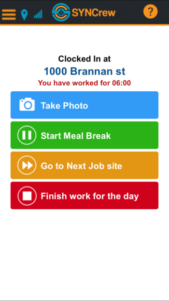
  1. Manage their own time: Most Manager users start their day by clocking in, taking breaks, and snapping photos.
  2. Add hours for others:
    1. Identical time to their own: Each time they clock out or change task, they have the opportunity to add time for others. As they clock out, the app will ask who worked with them and the Manager can then select as many Managed Workers as they had that day.
                 
    2. Add any other hours: The Manager can add hours for Managed Workers who worked at a different project, performed a different skill, or worked different hours. By using the “add time” option from the menu, these hours can be added from the app in just a few seconds.


Related posts:

Worker Type: Managed Worker

“Managed Worker” accounts are for employees who do not use the app and have their hours entered by an administrator or a Manager Worker. They are not able to log into the SYNCrew app to take photos or log hours. They may be given a login to the Worker Portal where they can view their hours and the system is able to generate timesheets for them. Because these users do not need to log in, the only information required to create an account is their name.

All Manager Workers and Admin users can create hours for any Managed Worker.

Related posts:

Worker Type: Hourly Worker

Hourly Worker” is the standard Worker type and is automatically selected since this is how the majority of SYNCrew Workers are set up. Hourly workers use a specific phone to clock in, clock out, take meal breaks, snap pictures, and view their hours worked. This user type is typically used by hourly employees but some companies use it for contractors who find it convenient to see their time worked.

Below are examples of how the SYNCrew app looks for Hourly Workers and some notes about how it differs from other user types:

  1. Pick a project screen: This is the screen where the Worker selects the project they are going to start working at. Note the red at the bottom to note this Worker is clocked out and the clock showing no time has been worked today. A clocked in worker will have a green bar indicating that they are traveling between jobs, but still on the clock. A meal break can be taken from this screen by clicking the three orange bars at the top left.
  2. Clocked in screen: This is the screen that hourly workers see when they are clocked into a project. Again, we see that the time worked clock is prominently displayed for this user. The take break button is prominently displayed to remind Hourly Workers to take their required meal periods
  3. My Time screen: Hourly workers can view their hours worked for prior days and the current pay period.


Related posts:


Worker Type: Non-Hourly Worker

“Non-Hourly Worker” is selected for Workers who will use the mobile app primarily to collect photographs and share their current location. They are not able to see their time worked, take meal breaks or change tasks to track mileage and travel time. Some companies prefer to use the Non-hourly Worker type for managers or sub-contractors who are not paid hourly.

Below are examples of how the SYNCrew app looks for Non-Hourly Workers and some notes about how it differs from other user types:

  1. “Check In” Screen: In the Non-Hourly Worker app, there are no clocks and the langues is based on “checking in” rather then “clocking in”
  2. “Checked in” Screen: After the Non-Hourly Worker selects a project, the screen below is what they see while on-site. Again, there are no clocks and the options to take a break are removed since these Workers are not logging those details.


Related posts:

Reset password for Worker app (also how to resend the app download link)

In the event that an employee forgets their password, it can be reset in one of the following two ways:

Reset from Admin portal: In most cases, Workers will just reset their password using the link in the app (described below). If they do not see that or it does not work for them (most often because the phone number in SYNCrew does not match what they are entering), they may ask an Admin to reset their password and this is how to do it:

  1. Click “Settings” in the left navigation panel and then click “Manage Users” from the sub-men.
  2. Find the user you wish to reset the password for. For larger companies, we use the browsers search feature (usually CTRL+F) and type the name.
  3. Click on that users name to open their profile.
  4. Click “Reset Password” at the bottom of the page (you may need to scroll).
  5. Type the same password in both fields on the next page and click “Save”
  6. A text message with the new password will be sent to the Worker automatically with the link to download that app and their password.

Reset from the app: Workers can reset their password directly form the app. On the login screen, there is a “reset password” button. When they click this button, the app will ask them to enter their phone number. If the phone number is assigned to an active worker they will receive a text back with a new password to log in with.

Add a new user (add a new worker; add a new admin)

ONLY FULL ADMIN ARE ABLE TO ADD USERS. If you are not a full admin, please contact an HR or IT administrator for additional help.

To add a worker or admin user do the following:

  1. Go to the Settings option in the left navigation
  2. Select the sub-option to “Manage Users”
  3. Click on either “add new worker” or “add new admin,” depending on which you wish to add (circled in red below)
  4. Fill in the required forms on the add user page that comes next and click “Save.” When you click save, an email will be sent with the login information and for Worker accounts, it will also send a text message with the login info

Types of Worker Accounts

There are different kinds of Worker accounts. When you create a new Worker account, you are asked what to select a “Worker type.” Below is a description of each type and also a how they are different. Workers may be switched from one user type to another at any point when the worker is clocked out.

  1. Hourly Worker:  Hourly Worker is the standard Worker type and is automatically selected since this is how the majority of SYNCrew Workers are set up. Hourly workers use a specific phone to clock in, clock out, take meal breaks, snap pictures, and view their hours worked. See more about Hourly Worker Type.
  2. Non-Hourly worker: Non-hourly workers can use the mobile app primarily to collect photographs and share their current location. They are not able to see their time worked, take meal breaks or change tasks to track milage and travel time. See more about Non-Hourly Worker Type.
  3. Manager: Manager Workers use the app to track their own time and breaks and are able to take pictures. They can also add and view time for themselves and Managed workers both from the app or by logging into work.syncrew.com See more about Manager Worker Type.
  4. Managed Worker: Managed worker accounts are for employees who do not use the app and have their hours entered by an administrator or a Manager Worker (described above). See more about Managed Worker Type.

Below is where you select the Worker Type in when editing a Worker account:

Add New Project

The Quick Add menu is the fastest way to add a new Project for your Workers to clock in to. If you have a lot of projects to add (10 or more), you might prefer to use the project importer described here.

To add a new project:

  1. Click on “Quick Add” in the menu at the left
  2. Select “Add New Project”
  3. Fill in all required fields. For reference, “Name” is what shows up in the app and the admin portal while “address” is where the GPS pin will be set.
  4. Click “Save” to add the project. If you have other projects to add, click “Save & New”

Your project should be visible in the Admin portal immediately and on Worker phone apps within a few minutes (assuming they have a data connection on their phone).

Add Worker Time

When you need to add time to a Worker’s records because they did not or could not from their phone.

Quick Add

  1. Click on “Quick Add” in the left navigation panel
  2. Select “Add Worker Time”
  3. Fill in all required fields.
    1. You may select multiple Workers at one time
    2. The break time you select will NOT deduct time from the time worked (example: select 8 hours worked, 30 minute break, and 8am start will create a day from 8am to 4:30pm with 30 minutes break at noon)
    3. The system will prevent you from creating overlapping time
  4. Click “Submit” to add the hours for the employee. If you have other hours to add, click “Submit & Add more time”.

Worker Time Review

Time can also be added easily on the worker time review page by clicking the green “+” icon on the blank day or clicking into the day and selectiong “add time before” or “add time after.” More info on Worker Time Review can be seen ON THIS PAGE.

If you have trouble: If you have trouble adding hours (typically because of overlapping time issues), please email support@syncrew.com what hours you want added and we will resolve the issue and add the hours for you.

How to reactivate an employee who was previously deactivated

If an employee returns to the company or was accidentally deactivated, follow these instructions to make them active again.

  1. To Enable a Worker or Admin account, click “settings” on the left navigation panel and then select “manage users”
  2. In the filter at the top, select either “Inactive” or “all” and click “go”
  3. Find the user you wish to enable. For larger companies, we use the browsers search feature (usually CTRL+F) and type the name.
  4. Click the “enable” button in that row.
  5. The main user page will reload with a confirmation message at the top.