Employee location is showing far away

Location is a fairly complicated issue and the SYNCrew team is always happy to help you look into any issues or questions you may have by contacting your account manager or our support team at support@syncrew.com.

There are a number of honest reasons why an employees reported location could be incorrect but hiding location is also a way that many employees have tried to cheat on their hours! This is another place where SYNCrew photos prove their worth – if the clock in or out in question has a photo of the job that you can identify, then that proves they were there, regardless of what the GPS position says.

Some notes about location: SYNCrew asks the phone for its latest location, but does not make the user wait. If the location is not ready right away, the app just takes the last-reported one location so that there is no waiting EVER to clock in. Many apps have “loading” screens that exist solely to make the users wait while the phone determines its location, but our product team decided it was better to let people get to work since we also have the photograph to prove location.

SYNCrew shows you the GPS status on the Teams page, see HERE for more info.

Here are some common reasons that location is slower:

  • Android Locations settings: Android phones have a few ways and we see “GPS only” selected fairly often because people think it will be more efficient for the battery (its not!). In this mode, for example, it can take up to three minutes with a clear view of the sky for it to work. Ideally, it would be set to “high accuracy mode.”
  • Wifi is off: Employees do this a lot to save battery, but its actually the main way that phones determine their location! When the phone is in “high acuracy mode” it will mainly use wifi to determine the phones location, so if wifi is off, you are practically in GPS-only mode.
  • Location is turned off: This is a quick setting that a log of people will flip off if they are not using it to save battery life. How much this helps save battery is not clear, but we see it often.
  • Old Phones:  Sometimes older phones just get really slow at reporting their location. There is not technical reason for this, but if its a really worn out phone, they often have trouble determining their location.

Reports: Activity Reports

Activity Reports are a simple report to show a view of all the events your workers make. There are no calculations performed as this report simple displays the events as they are. For example, a day where a worker clocked in, started lunch, ended lunch, took a progress photo, and clocked out would show as 5 rows in this report.

The report is most commonly used to find photos or make edits to events since its easy to view photos and make edits.

How to run a Work Block report:

  1. Select “Activity Report” from the Reports menu
  2. Filter your report for the projects, workers and dates you want. The time defaults to “Today” but you can select a lot of other pre-loaded times, like last week, Month to Date, etc. If you click on “Custom Time” you can put your own desired time period. Custom fields may appear below Worker and Project if they are enabled for your company.
  3. Click “Run.”
  4. Once the report loads, you should see a report that is a series of rows. Each row represents an event by your employees. You may edit the events or view the event photo using the buttons at the right. Also note that you may export the report to a Comma Separated Variable file that can be opened in Excel or other spreadsheet programs.
  5. The filters are still available on top in case you need to adjust something and re-run.

Limited Admin vs. Full Admin

When you create an admin user, you have the option to create a Full Admin or a Limited Admin. If you have questions about who should have what kind of admin login, please contact your account manager our our support team to discuss the details of your company’s situation.

Full Admin: A Full Admin can do and change everything. For small companies, it is usual for everybody to be a full admin.

Parent Admin: This is a special kind of admin that companies with multiple SYNCrew locations have. They are effectively Full Admin who can switch between locations. 

Limited Admin: A Limited Admin is exactly what the name says, limited in the following ways:

  • No Admin Access: No Limited Admin may access the “Admin” tab to edit settings, add/remove users, add/remove projects
  • Options: Depending on your goals, the limited admin can be further edited as follows: Full Report Access: By default, limited admin can run reports but will only see data from projects they have access to. There is an option to make them able to see report data for
    • Disable Editing Privileges: By default, a Limited Admin can edit data they can see. You may disable their editing privileges so they can not make edits. This effectively makes them a “view only” user
    • Disable Manage Menu: By default, limited admin users can access the manage menu. Clicking this option prevents the limited admin from seeing the menu or accessing its features (timesheets, worker time review, etc.)
    • Project Type: By default, limited admin can see all projects. If you select the option “Limited Projects” in this menu, you can then pick which projects this admin can see. Some companies use this to give their clients access to view activity for just that client’s locations. Others use this to make it easier for managers to see only the projects they are managing
    • Full Report Access: This option does two things:
      • 1) If projects are limited as described above, then this will allow the Limited Admin to run reports across all projects
      • 2) This allows Limited Admin to access Timesheets in the manage menu
    • Quick Add Menu: By default, Limited Admin do not have access to the Quick Add menu in the left-navigation. You can enable a Limited Admin to be able to add worker time OR add projects OR new workers (or any combination of the three). If none is selected, the Quick Add menu will not be shown to the Limited Admin

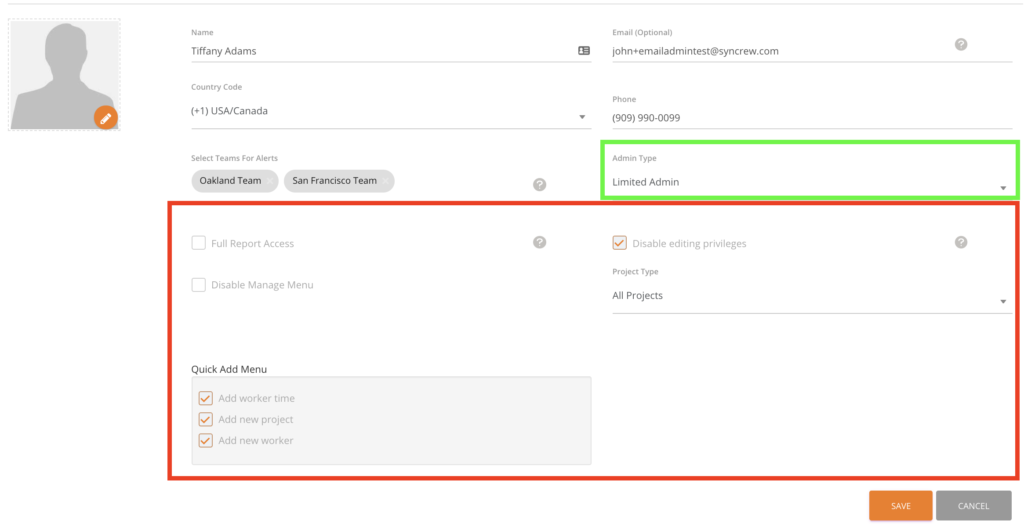
Here are the options you will see once you toggle an Admin user to be a Limited Admin:

  • Shown in green below is where you select whether a user should be a full or limited admin
  • Shown in red below are the options for a limited admin

How to see what edits have been made (aka how to view audit logs)

99% of events like clock ins, clock outs, and breaks are created by your employees and never edited. Sometimes, edits need to be made and SYNCrew keeps a log of the original times in case there is ever a reason you need to view the original times.

To see if changes have been made, follow these instructions:

  1. Run a Work Block Report
    1. go to the Settings menu and select “Work Block Report”
    2. Select the person(s) and date range you want to view
    3. Click “Run”
  2. At the far right side of the Work Block report, you will see a column that contains either who created the event or an “Audit” button. For the rows with just text, there have been no edits made and all events are original. Additionally, you can see whether the Worker, a Manager, or an Admin user made. In the image below:
    1. The first and last rows below have had edits made, as indicated by the “Audit” button
    2. Rows 2 and 3 were created by a Worker (Named John iphone) on their phone and no edits have been made
    3. Row 4 was created by an Admin user (name John Admin) and no edits have been made since
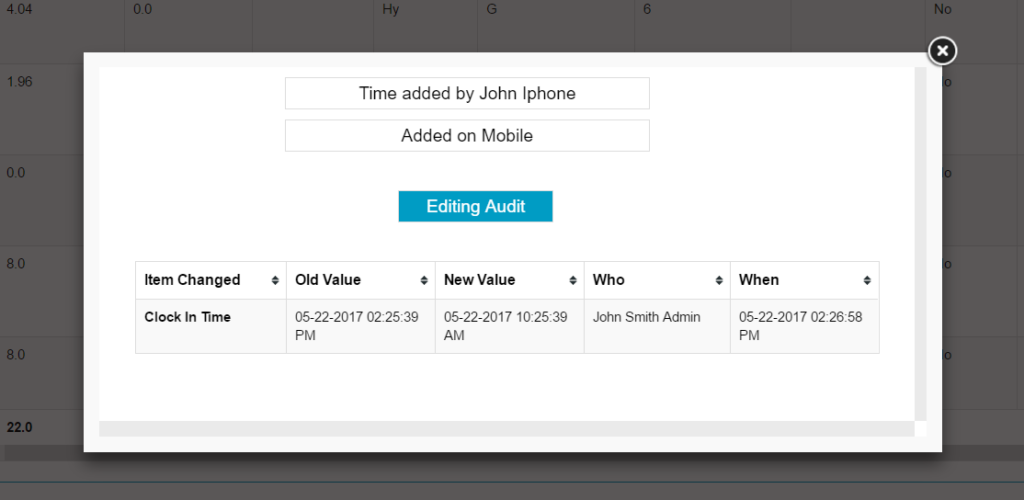
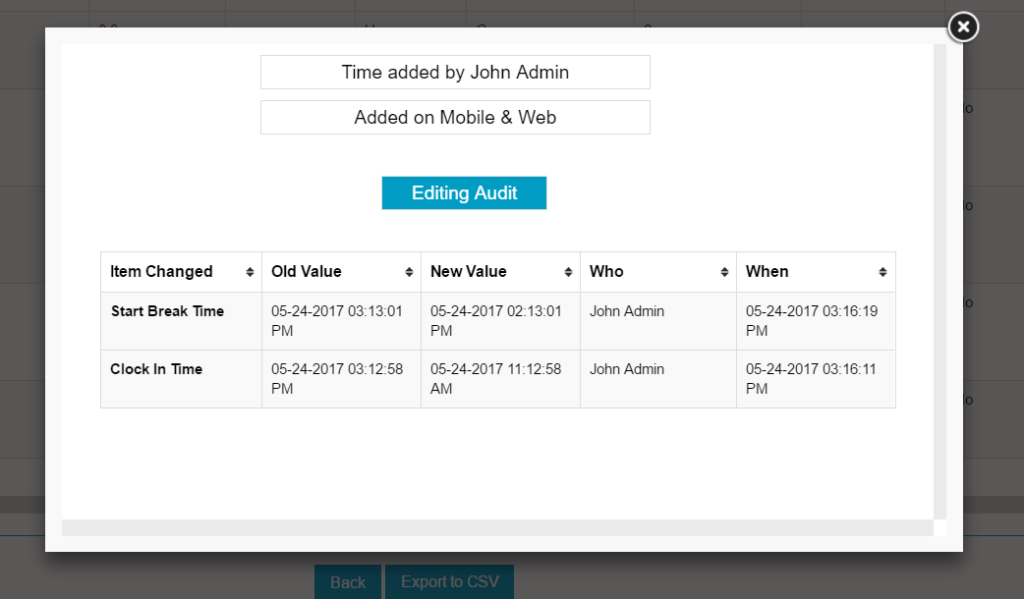
  3. To view the edits, click on the “Audit” button to see the changed made. In the example
    1. Example 1: start time was changed from 2:25pm to 10:25am on the same day. Note that “John Smith Admin” was the person who made the change and the change was made on 5/22/17 at 2:26pm.
    2. Example 2: This example has two changes. The clock in time was changed from 3:13pm to 2:13pm and the start break time was changed from 3:13pm to 2:13pm. Here, John Admin made the change at 2:26pm on 5/22/17 at 2:26pm.

To view edits made to projects, users, and other settings, please contact your SYNCrew account manager or support@syncrew.com as that information is available, but not visible to you just yet.

How to delete events (delete clock out, delete clock in, etc.)

SYNCrew is a management tool but it also serves as a valuable archive of all activities. As such, events cannot be deleted. In most cases, the issue can be resolved by editing the time to be a few seconds which effectively makes the time disappear. By editing, instead of deleted, the record is kept intact so that the editing history is complete and nobody can be accused of deleting information at a later date.

In certain circumstances, SYNCrew staff can delete things but it is typically limited to:

  • Events that were added by administrators
  • Events created for testing purposes by either SYNCrew or company administrators
  • Profane or pornographic images

Late Clock Out

Every so often, a Worker forgets to clock out at the end of the day. When that app believes that has occurred, it gives the Worker an opportunity to clock out at an earlier time to prevent their being clocked in for 24 hours or longer. The app alerts the Worker that it believes they forgot to clock out and asks the Worker to enter the time and date that they stopped working and explain what happened.

Since this happens after-the-fact, there is no photo taken and SYNCrew places the image below in place of the picture so its easy to see when this occurs. The GPS coordinate is taken from where the employee is at the time the late clockout is entered.

Worker Type: Manager

The “Manager Worker” is a user type for onsite managers who need to add time for other employees. They manage their own time as they go (just like an Hourly Worker) and then they can add time for any Managed Worker. Note that Managers are NOT able to add hours for Hourly Workers, Non-Hourly Workers, or other Managers.

  1. Manage their own time: Most Manager users start their day by clocking in, taking breaks, and snapping photos.
  2. Add hours for others:
    1. Identical time to their own: Each time they clock out or change task, they have the opportunity to add time for others. As they clock out, the app will ask who worked with them and the Manager can then select as many Managed Workers as they had that day.
                 
    2. Add any other hours: The Manager can add hours for Managed Workers who worked at a different project, performed a different skill, or worked different hours. By using the “add time” option from the menu, these hours can be added from the app in just a few seconds.


Related posts:

Worker Type: Managed Worker

“Managed Worker” accounts are for employees who do not use the app and have their hours entered by an administrator or a Manager Worker. They are not able to log into the SYNCrew app to take photos or log hours. They may be given a login to the Worker Portal where they can view their hours and the system is able to generate timesheets for them. Because these users do not need to log in, the only information required to create an account is their name.

All Manager Workers and Admin users can create hours for any Managed Worker.

Related posts:

Worker Type: Hourly Worker

Hourly Worker” is the standard Worker type and is automatically selected since this is how the majority of SYNCrew Workers are set up. Hourly workers use a specific phone to clock in, clock out, take meal breaks, snap pictures, and view their hours worked. This user type is typically used by hourly employees but some companies use it for contractors who find it convenient to see their time worked.

Below are examples of how the SYNCrew app looks for Hourly Workers and some notes about how it differs from other user types:

  1. Pick a project screen: This is the screen where the Worker selects the project they are going to start working at. Note the red at the bottom to note this Worker is clocked out and the clock showing no time has been worked today. A clocked in worker will have a green bar indicating that they are traveling between jobs, but still on the clock. A meal break can be taken from this screen by clicking the three orange bars at the top left.
  2. Clocked in screen: This is the screen that hourly workers see when they are clocked into a project. Again, we see that the time worked clock is prominently displayed for this user. The take break button is prominently displayed to remind Hourly Workers to take their required meal periods
  3. My Time screen: Hourly workers can view their hours worked for prior days and the current pay period.


Related posts: